All guides
Start here
Customers and billing
Hotspot
Network
- Devices, OLTs and ONUs
- Routers, RADIUS and sessions
- TR-069 and remote ONU setup
- Zones, nodes, topology and the map
Support and messaging
Your team and settings
For your subscribers
Troubleshooting
On this page
- Where everything is
- All Devices
- Add a router or OLT
- Connect over the management tunnel
- The device page
- ONUs
- Signal levels in dBm
- Find out why an ONU is down
- Authorize a new ONU
- Pre-register ONUs before installation
- See outages on the Status timeline
- Link ONUs to subscribers
- Bulk actions and the Fleet Push Center
- An ONU's own page
- Passive Devices
- Monitoring
- Mgmt Profiles and Credentials
- Telegram alerts
- Common mistakes
- If it doesn't work
All Devices#
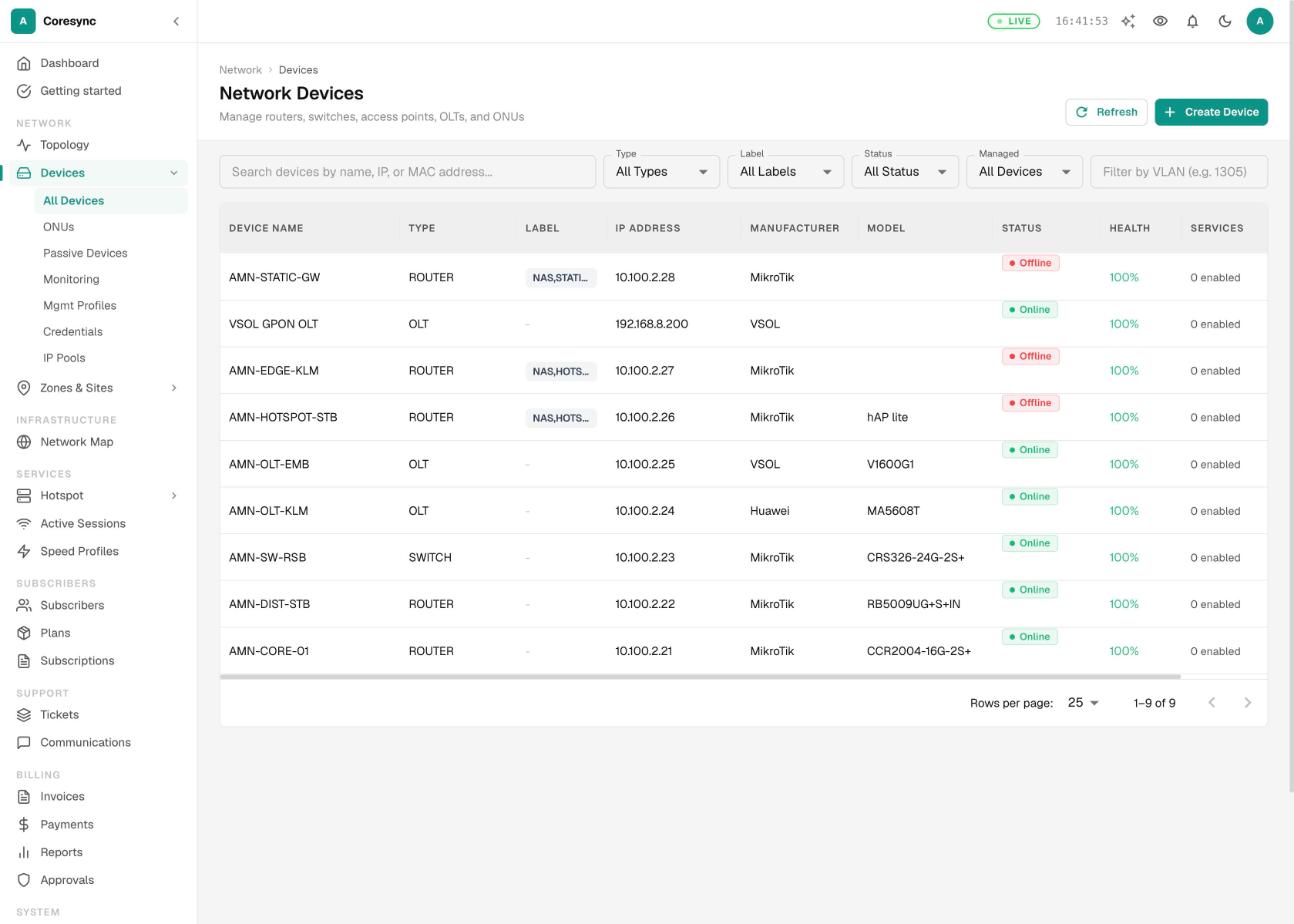
All Devices lists your routers, OLTs, switches and access points. ONUs aren't in this list: they have their own page, because there are usually hundreds of them.
- Search by name, IP or MAC address, or filter by Type, Label (for example NAS Devices), Status and Managed. You can also type a VLAN number to find the devices that carry it.
- Status shows whether the device answers. A red IP conflict chip means two devices share the same address, so the status may belong to the other one. Fix the address on one of them.
- Click a row to open the device page. The ⋮ button on the right has Edit Device and Delete Device.
- If another ISP has offered to share a device with you, the offer shows above the list. Press Accept to add it to your network, or Decline. Nothing appears in your list until you accept.
Add a router or OLT#
Add each router and OLT once. CoreSync then watches it, logs in to it when you ask, and lets you manage it from its page.
- On All Devices, press Create Device.
- Step 1: pick what the device is. Choose Hotspot / PPPoE Router for a router your customers log in through, OLT (Optical Line Terminal) for an OLT, Router for a plain router with no customer logins, or Switch, Distribution / Switch, Core Router, BGP Router or Monitor / Other.
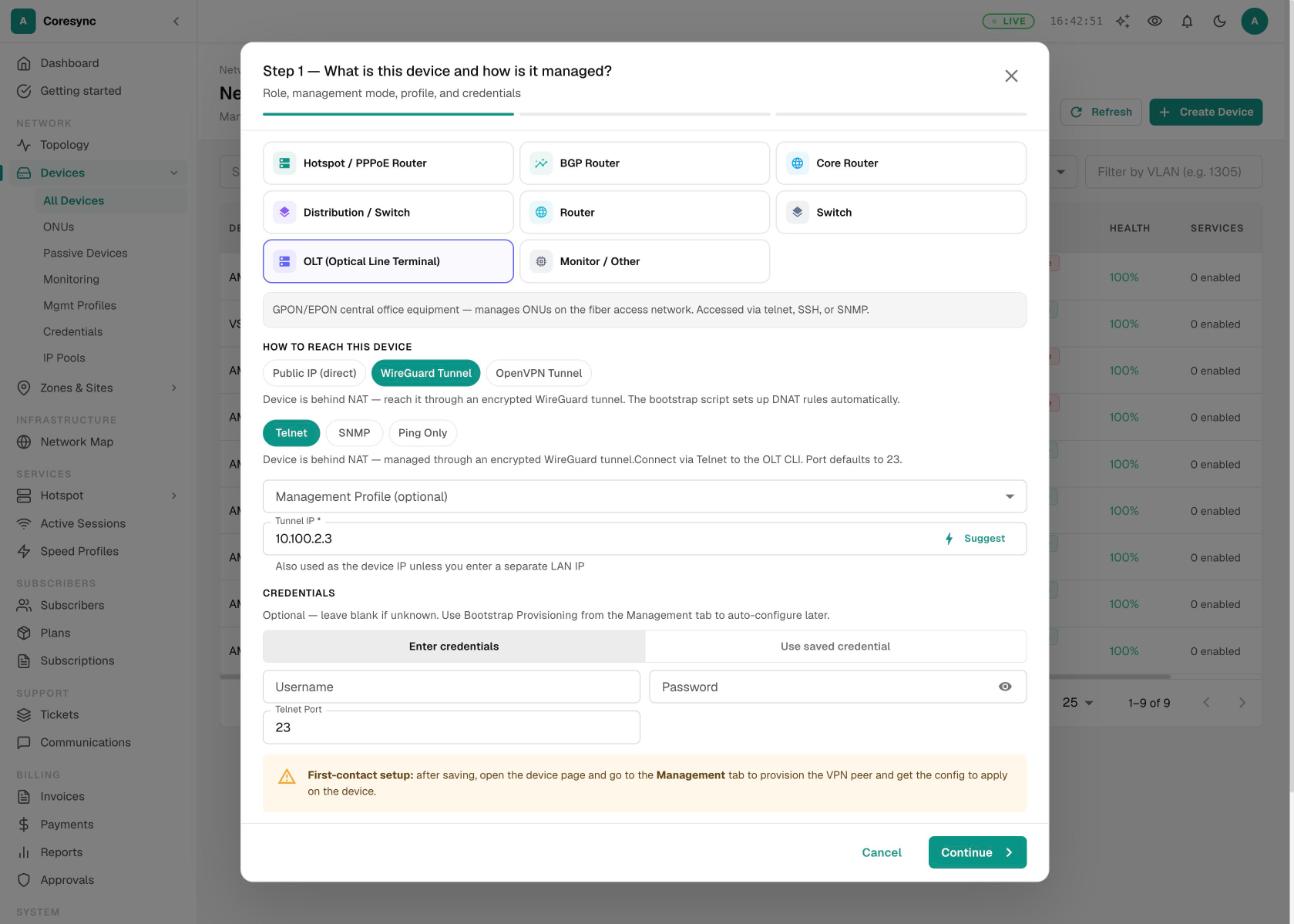
- Under How to reach this device, choose Public IP (direct) if CoreSync can reach it on a public address, or WireGuard Tunnel or OpenVPN Tunnel if it sits behind NAT. Most routers behind a normal internet line need a tunnel.
- Pick how CoreSync logs in: MikroTik API or Direct SSH for routers, Telnet or SNMP for OLTs, or Ping Only if you only want to know whether it's up. Then type the Username and Password, or press Use saved credential to pick one from Credentials. For a tunnel, type the Tunnel IP or press Suggest. Press Continue.
- Step 2: give it a Device Name, its IP Address, manufacturer and model, and its Zone and Node. If the device sits behind one of your routers, pick that router as the Upstream / Parent Device.
- For a customer router, tick the services it handles (Hotspot, PPPoE, Static IP) and type the RADIUS Secret. Leave Alert notifications enabled ticked. Tick Daily config backup to keep a copy of the router's config every night.
- Press the save button. It reads Save & Get Setup Guide for a customer router, Save & Connect for an OLT, and Save & Test or Save Device for others. Step 3 then helps you connect, as below.
Connect over the management tunnel#
Most of your routers sit behind NAT, so CoreSync can't reach them directly. A management tunnel (WireGuard or OpenVPN) gives CoreSync a private path to the router. RADIUS logins, device checks and every action on the device page travel over it.
A new router reached through a tunnel
- After you save it, step 3 of the wizard shows Get Bootstrap Script. Press it.
- Press Copy and paste the one-line script into the router's terminal (Winbox → New Terminal). It sets up the tunnel by itself.
- Wait. CoreSync checks every 10 seconds, and the router normally comes online within 1 to 2 minutes. The wizard then says the router is reachable.
A router you already added, reached on its public IP
- Open the router and go to the Management tab.
- Press Set up tunnel and read the summary, then press Set up tunnel again to confirm. If CoreSync says the device can't be put on a tunnel right now, it tells you why.
- CoreSync saves the router's config first and arms a safety net: if it loses the router during the change, the router undoes everything by itself within 5 minutes. When it works, the tunnel becomes the main path and the public IP stays as a checked backup.
An OLT behind one of your routers
In step 2, pick the router as Upstream / Parent Device and answer Yes — reach via parent's tunnel. Type the OLT's LAN IP. After you press Save & Connect, CoreSync sets up the forwarding on the router by itself, then checks it can log in to the OLT. You want to see OLT management login verified. If the OLT isn't reachable later, its Management tab shows a connect card with Connect Automatically or Connect & Verify.
The device page#
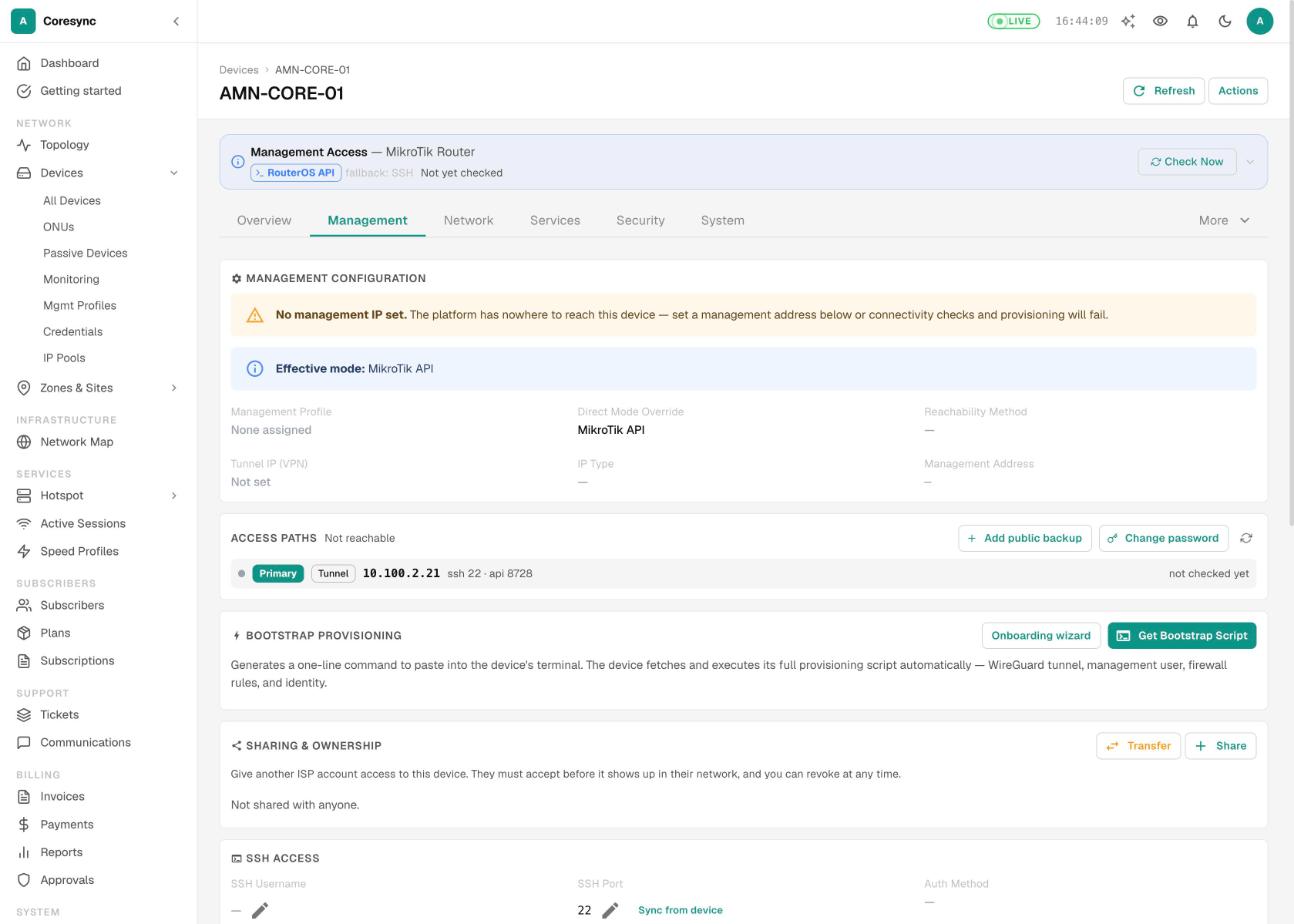
Open any device to see its page. The top shows its status (online or offline) and reachability (Reachable, Unreachable, Pending Contact). The Actions button has Edit device, Detect device type, Onboarding wizard and Delete device.
The tabs depend on the kind of device. Router tabs such as Network and Services appear once CoreSync knows what the router is. If they're missing, use Actions → Detect device type.
| Tab | Shown for | What's on it |
|---|---|---|
| Overview | Every device | Status, health and key details. For an ONU: signal, identity and history. |
| Management | Every device | How CoreSync reaches it: mode, profile, tunnel IP, management address, the backup path, Set up tunnel, Winbox Access and Sharing & ownership. On an OLT, also Discover ONUs and Signal thresholds. |
| Line Cards, PON Ports, Uplink, VLANs, Profiles | OLTs | The OLT's cards, PON and uplink ports, VLANs and management profiles, read live from the OLT. VSOL OLTs have no Line Cards tab. |
| Network, Services, Security, System | Routers | Interfaces, addresses and routes; PPPoE, hotspot and RADIUS; firewall and NAT; identity, version and resources. |
| Subscribers | Routers | The subscribers on this router. |
| IP Pools | OLTs, and routers with static pools | The address pools tied to this device. |
| Interfaces, Clients, Config, WAN | ONUs whose OLT position is known | The ONU's ports, connected devices, config and WAN, read through the OLT. |
| WAN Connections, TR-069 | ONUs (TR-069 only when on the ACS) | See TR-069 and remote ONU setup. |
| Wireless | Devices with Wi-Fi | Wireless settings and clients. |
| NAS Setup | Customer routers | RADIUS health checks and fixes. See Routers, RADIUS and sessions. |
| Traffic | Every device | Traffic graphs. |
| Backups | Devices with daily backup on | Nightly config backups, taken at 02:00 and kept 61 days. |
Winbox Access on the Management tab gives you a short-lived address, username and password to open the router in Winbox through CoreSync. Press Start Session, paste them into Winbox, and close the session when you're done.
Sharing & ownership lets you give another ISP on CoreSync access to a device you share (for example an OLT you both use). Press Share, type their tenant code and choose Manage (full) or View only. They must accept it. Transfer hands the device to another ISP for good. Shared networks are covered in Zones, nodes, topology and the map.
ONUs#
ONUs lists every ONU on every OLT you've added. It has four tabs: Configured, Unconfigured, Status timeline and Pre-registered.
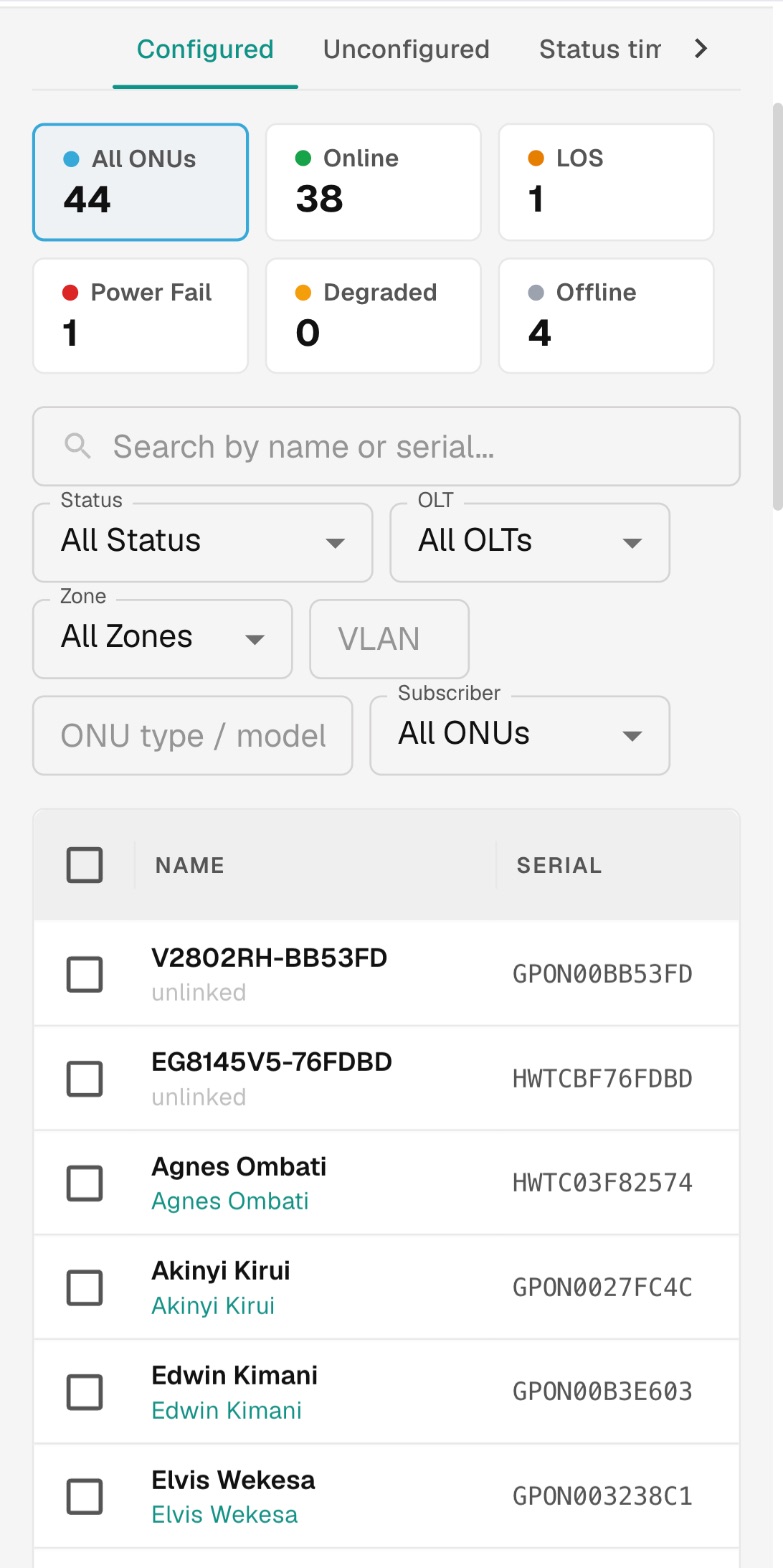
On Configured, the cards at the top count your ONUs: All ONUs, Online, LOS, Power Fail, Degraded and Offline. Click a card to show only those ONUs. Below them you can search by name or serial, and filter by OLT, zone, VLAN, ONU type / model and Subscriber (Linked or Unlinked). Once you've added splitters, a Splitter filter appears too.
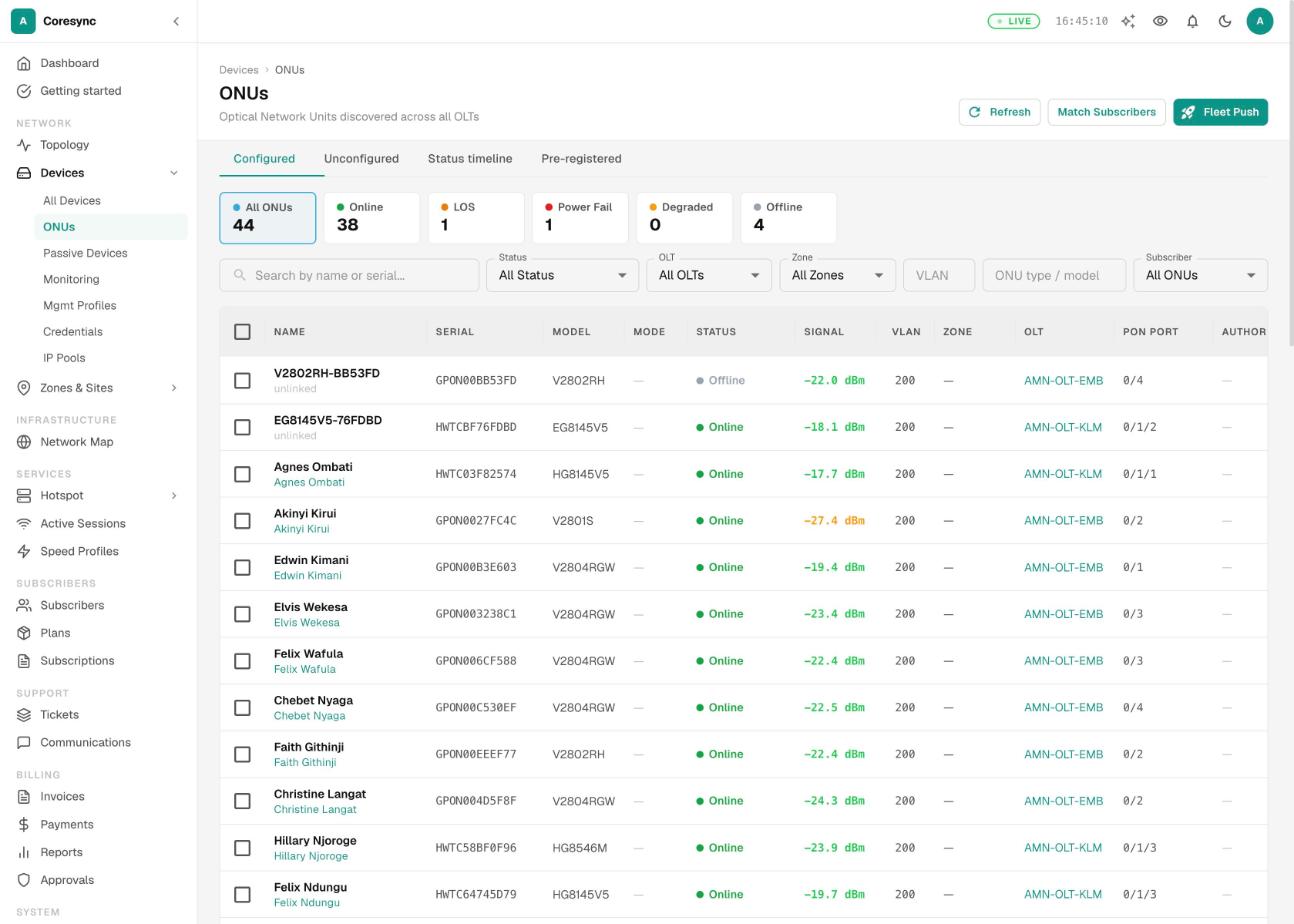
Each row shows the ONU's name with its subscriber under it (or "unlinked"), serial, model, mode, status, signal, VLAN, zone, OLT and PON port. CoreSync refreshes ONU status from your OLTs every few minutes. Press Refresh to reload the list.
| Status | What it means | What to do |
|---|---|---|
| Online | The ONU is up and the OLT can see it. | Nothing. |
| LOS | Loss of signal: no light is reaching the ONU. The fibre is cut, bent, dirty or unplugged. | Send a technician to check the fibre and connectors. |
| Power Fail | The ONU said goodbye as it lost power ("dying gasp"). | Ask the customer to check the ONU's power. Usually not a fibre problem. |
| Signal Degraded | Online, but the signal is weaker than your warning level. | Clean or re-splice before it drops. |
| Offline | The OLT can't see the ONU and recorded no clear cause. | Open the diagnosis to see its history. |
| Inactive | Switched off on the OLT by an admin. | Enable it from the ONU's page if that was a mistake. |
| Misconfigured | The OLT reports a configuration mismatch for this ONU, such as the wrong ONU type. | Check its type and settings, or resync it from its page. |
Without View Device Reports, the count cards show ••• instead of numbers. The list itself still works.
Signal levels in dBm#
The Signal column shows the light the ONU receives, in dBm. The numbers are negative: closer to zero is stronger. CoreSync colours each reading the same way on every page.
| Reading (default levels) | Colour band | Meaning |
|---|---|---|
| -27 dBm or stronger | Good | Healthy. |
| -27 to -30 dBm | Warning | Weak. Works, but drops are likely as it gets worse. |
| Below -30 dBm | Critical | Too weak. Expect drops and slow speeds. |
| Stronger than -8 dBm | Too hot | Too much light. The ONU needs an attenuator. |
You can change the warning and critical levels for each OLT, for example if one OLT has stronger optics:
- Open the OLT from All Devices and go to its Management tab.
- Find Signal thresholds and press Edit.
- Type the Warning below and Critical below levels, and press Save. Press Reset to default to go back to -27 and -30 dBm.
Find out why an ONU is down#
When a customer calls with no internet, find their ONU and click its Status, or use ⋮ → Diagnose. A panel opens on the right and asks the OLT for the ONU's state right now. This takes a few seconds.
- The likely cause at the top, in plain words.
- Phase state, Config state, Uptime, Distance, ONU receive and OLT receive (both signal levels), whether it's on TR-069, and when it was last seen.
- Its recent drops, each with the cause the OLT recorded: Power loss or Fiber (no light).
- The linked subscriber, and whether they have a live session right now.
At the bottom: Ping checks whether the ONU answers over TR-069, Refresh data re-reads it, Reboot restarts it (the customer is offline for 1 to 2 minutes), and Device opens its page.
You only need Edit Network Devices for the buttons. Looking at the diagnosis needs only View Network Devices, so customer care can use it too.
Pre-register ONUs before installation#
If you know the serial before the technician goes out, register it in advance. When the ONU is plugged in and shows up as unconfigured, CoreSync authorizes it by itself within about 2 minutes, with its preset, name and subscriber.
- Go to ONUs → Pre-registered and press Pre-register ONU.
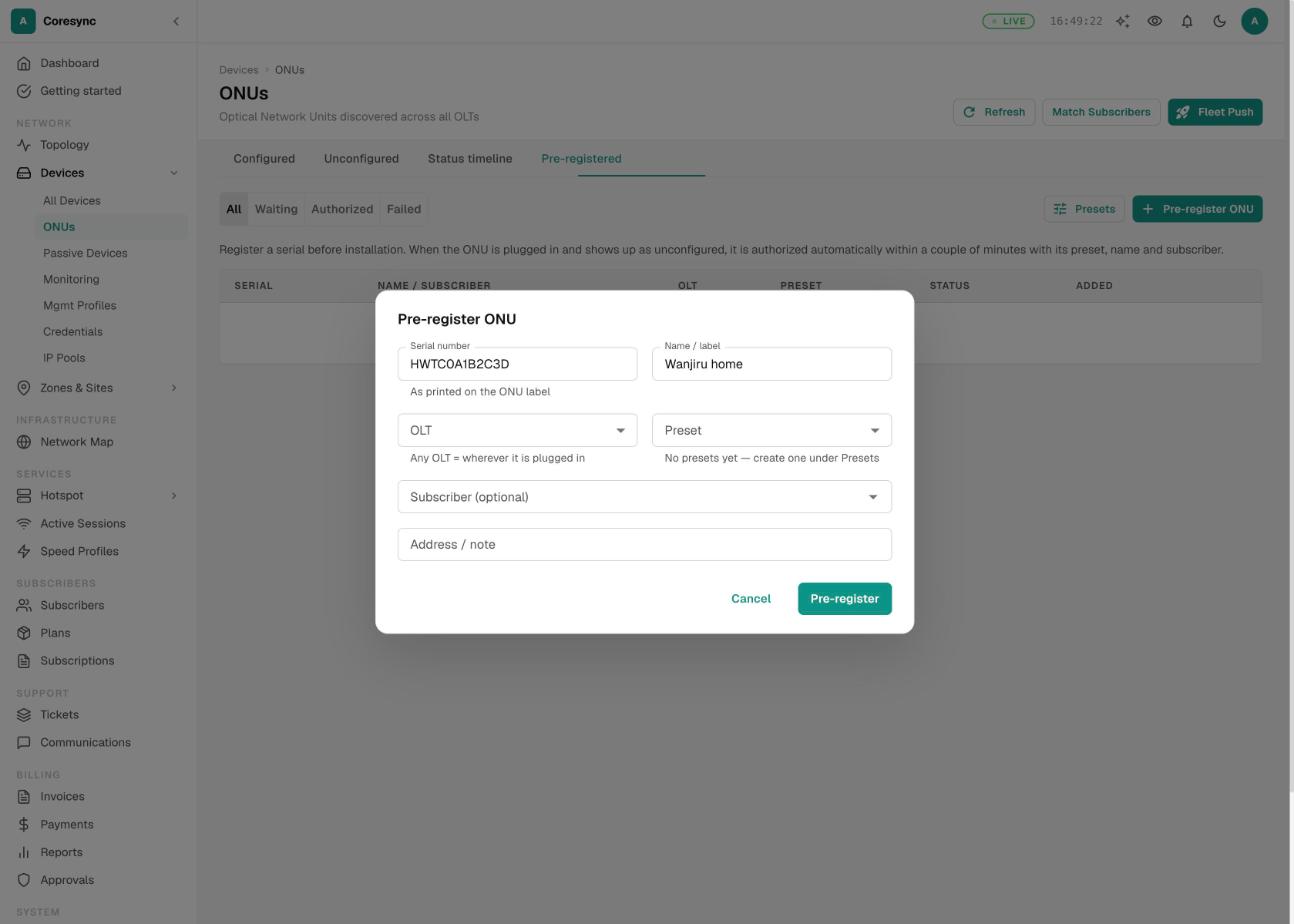
- Type the Serial number as printed on the ONU label, and a Name / label.
- Choose the OLT, or leave Any OLT if you don't know where it will be plugged in.
- Pick a Preset (type, mode, VLAN, speeds). Make presets with the Presets button.
- Optionally pick the Subscriber (optional) and an Address / note, then press Pre-register.
The list shows each one as Waiting, Authorized or Failed. A failed one shows why. Fix the cause and press Retry.
See outages on the Status timeline#
Status timeline draws every ONU on one OLT as a bar across time, coloured by status. It's the fastest way to tell one customer's problem from an area outage.
- Go to ONUs → Status timeline and pick the OLT.
- Pick a PON port, or leave All PON ports. Choose 6 h, 24 h or 7 d.
- Turn on Only ONUs with outages to hide the healthy ones.
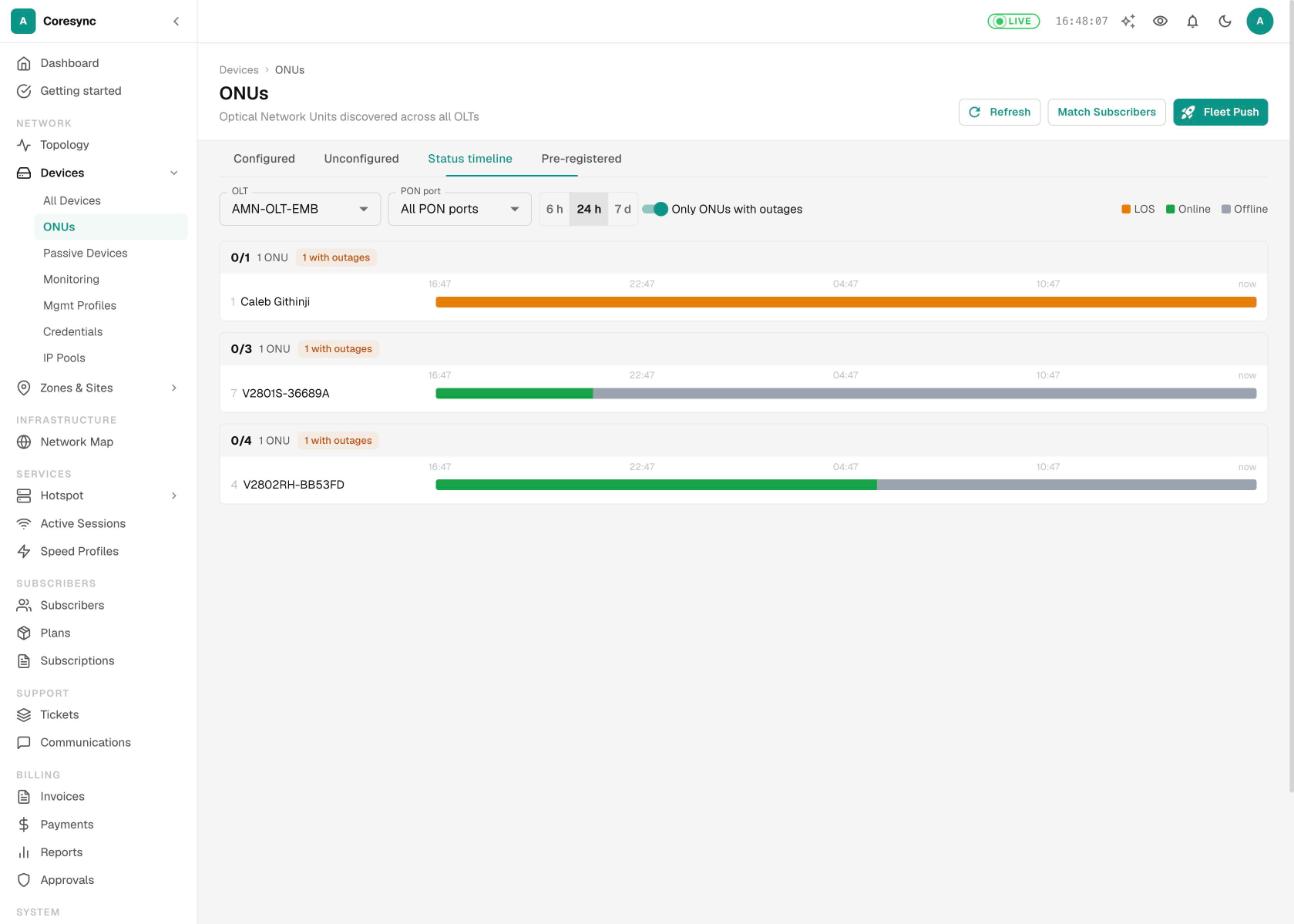
If many bars on one PON port change at the same moment, look at the shared fibre or splitter, not at each customer.
Link ONUs to subscribers#
Link each ONU to the subscriber it serves. Then you can see the ONU from the subscriber's page, see the subscriber from the ONU, and push their PPPoE login to it.
One ONU
- On Configured, press ⋮ on an unlinked ONU and choose Link to Subscriber.
- Search by username, name or subscriber code, and pick the subscriber.
- Tick Provision PPPoE now if you also want CoreSync to set the customer up for PPPoE: it updates their RADIUS login first, then pushes it to the ONU over TR-069. Press Link.
Many ONUs at once
- Press Match Subscribers at the top of the ONUs page.
- CoreSync suggests a subscriber for each ONU from its name, with a confidence: Exact (95-100%), Partial (80%) or Name (60%). Check the suggestions, change any that are wrong, and untick any you aren't sure of.
- Press Apply … Links. This only links them. It doesn't push anything to the ONUs.
Customer care can link with Edit Subscribers instead of Edit Network Devices.
Bulk actions and the Fleet Push Center#
For a few ONUs, tick them on Configured. A bar appears with Push PPPoE, Refresh, Ping and Reboot. Each one shows what it will do before you run it, and a result for every ONU afterwards.
| Action | What it does |
|---|---|
| Push PPPoE | Sends each ONU its linked subscriber's PPPoE username and password over TR-069. ONUs with no linked subscriber are skipped. |
| Refresh | Re-reads everything from each ONU (WAN, Wi-Fi, versions). |
| Ping | Checks which ONUs answer over TR-069. |
| Reboot | Restarts each ONU, over TR-069 if it's on the ACS, otherwise through the OLT. Each customer is offline for 1 to 2 minutes. |
For a whole group, use Fleet Push at the top of the page. You don't tick rows; you describe the group.
- Target: filter by OLT, status, zone, model, ACS link, Subscriber and Service VLAN. The push applies to every ONU that matches.
- Operation: Onboard to TR-069 (ACS + mgmt VLAN), Attach service VLAN, Push PPPoE credentials, Refresh device data, Reboot or Check connectivity.
- Preview: CoreSync tells you how many ONUs it will run on. Read the number.
- Run: press Push to … ONUs. It runs in the background, so you can close the window and come back to see the progress.
An ONU's own page#
Click an ONU's name to open its page. Besides the tabs above, the top has buttons for it:
- Web UI (or Enable Web UI) opens the ONU's own web page through CoreSync, without going to the customer.
- Reboot restarts it. The customer is offline for 1 to 2 minutes.
- Factory Reset wipes all its settings, including Wi-Fi and PPPoE. The customer stays offline until you set it up again.
- Actions has Resync config, Enable ONU or Disable ONU (on the OLT), and Delete device.
When you delete an ONU, CoreSync asks whether to Also remove it from the OLT (deauthorize). If you tick it, the subscriber loses service. If you don't, only CoreSync's record goes.
Factory Reset and removing an ONU from the OLT need Delete Network Devices.
Passive Devices#
Passive Devices lists your splitters, patch panels, ODFs, WDMs, couplers, splice trays and media converters, with their status (Planned, Active, Faulty, Decommissioned), node, split ratio and ports used.
Passive devices are drawn on the network map, so Add Device takes you there. Splitters you add show up in the ONU authorize form and in the ONU list's Splitter filter. See Zones, nodes, topology and the map.
Monitoring#
CoreSync checks every device about once a minute to see whether it answers, and reads CPU, memory and interfaces every 3 minutes. Monitoring shows the result: Total, Online, Offline, Unreachable, Links Down and Avg CPU, with a countdown to the next check.
- Overview: Top CPU, Top Memory and Recently Offline.
- Devices: every device with status, CPU, memory, uptime, check method and when it was last seen.
- Links: links between devices and whether they're up.
- Events: what went down and came back, newest first.
Press Check All Now to check every device straight away instead of waiting.
Check All Now needs Edit Network Devices.
Mgmt Profiles and Credentials#
If many devices use the same login, save it once instead of typing it on every device.
- Credentials holds saved logins: SSH — Password, SSH — Key, SNMP Community, TR-069 ACS, WireGuard Key and API Token. They're stored encrypted. Change one and every device using it picks up the change. When you edit one, leave a field blank to keep its current value.
- Mgmt Profiles holds how a group of devices is managed: a Management Mode, an optional Fallback Mode (optional), the Default SSH Username and SSH Port, and a TR-069 ACS URL.
- Press New Credential (or New Profile), fill it in and save.
- When you add or edit a device, press Use saved credential and pick it, or choose the Management Profile.
Telegram alerts#
CoreSync can post outage alerts to your team's Telegram groups: a device going down and coming back, and fibre cuts or power cuts that take out several ONUs on one PON.
- In Telegram, open @BotFather, send
/newbotand follow the steps. Copy the token it gives you. - In CoreSync, go to Settings → Telegram Alerts. Paste it into Bot token and press Connect.
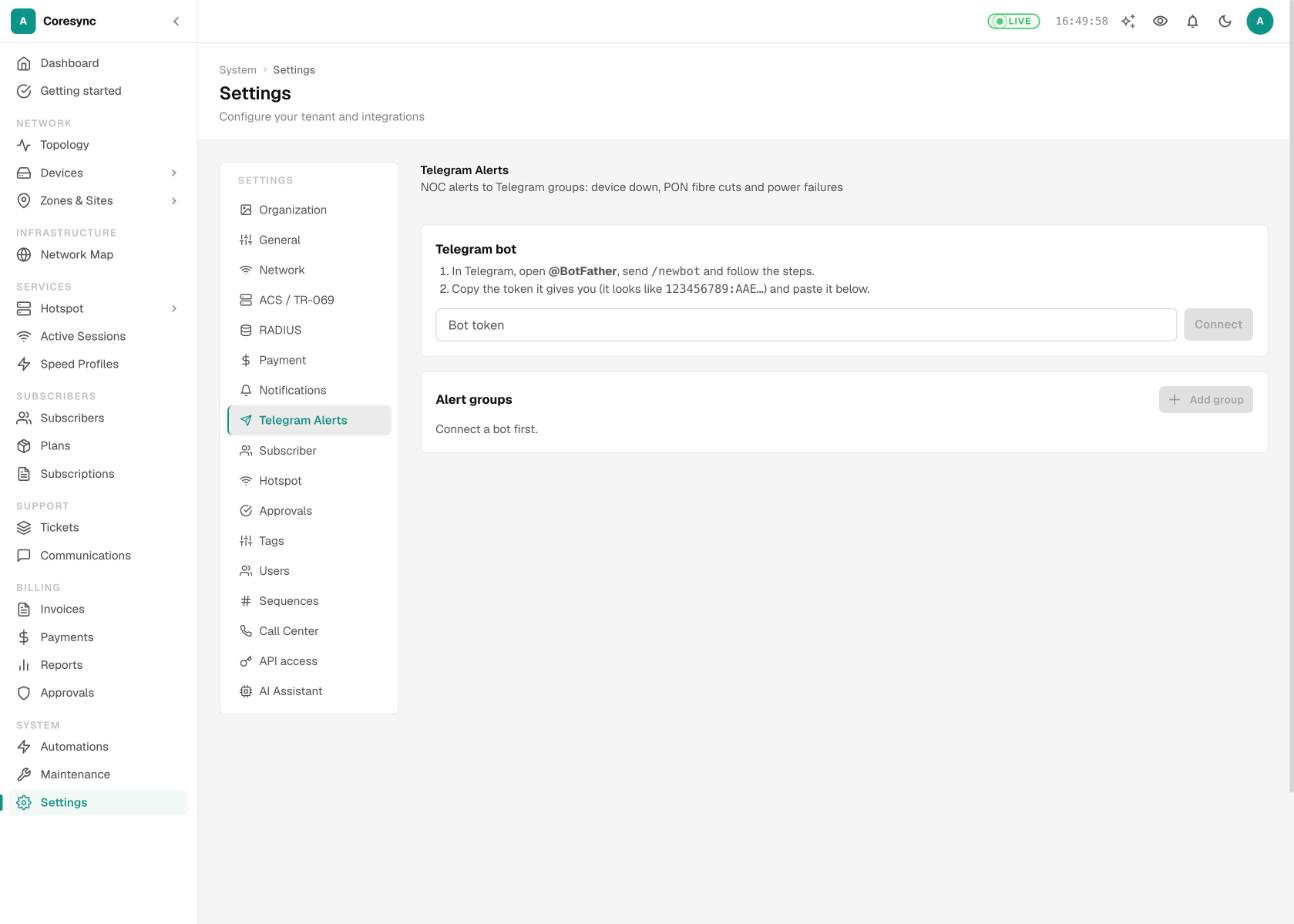
- Add the bot to your Telegram group and send any message in the group, so the bot can see it.
- Back in CoreSync, press Add group, then Find chats, and pick the group.
- Give it a Name. Under Devices, keep All devices or pick one OLT. Tick the alerts you want: Device down / back up, PON loss of signal, PON power failure.
- Set Min. ONUs affected (how many ONUs on one PON must go down together before a PON alert), Flap delay (minutes) (outages that clear sooner are never sent) and, if you like, Quiet hours from and Quiet hours until. Alerts in quiet hours wait until the end, and are only sent if the outage is still going. Press Save.
- Use the send button on the group to send a test message.
You can add several groups, for example one per OLT for the technicians in that area, and one for all devices for the NOC.
Common mistakes#
- Bulk pushing with no filter. The Fleet Push Center runs on every ONU that matches. Read the count on the preview before you press push.
- Pushing PPPoE before the RADIUS login is right. The ONU dials with whatever the subscriber record holds. Fix the subscriber first.
- Authorizing without Preview. Preview shows the OLT commands without sending them. Use it, especially on a new OLT model.
- Disabling an ONU for non-payment. Suspend the subscriber instead.
- Typing the same password on every device. Save it once under Credentials, so a password change is one edit.
- Two devices with the same IP. The IP conflict chip means the status you see may belong to the other device.
- Blaming the customer for an area outage. If many ONUs on one PON went LOS at once, it's the feeder fibre or splitter.
If it doesn't work#
A device shows offline or unreachable.
- Open it and go to Management. Press Check Now. The panel lists what to check for that management mode.
- Behind NAT with no tunnel? Set one up (see above). A changing public IP can't be reached directly.
- On a tunnel? Check the tunnel's last handshake under Maintenance → VPN. If the router lost internet, the tunnel drops with it.
- Ping only fails? Some devices block ping on their firewall even when they're up.
- Wrong login? Edit the device, or the saved credential it uses, and check again.
A new ONU never shows up in Unconfigured.
- Check the OLT is reachable and its login works: its Management tab should say OLT management login verified.
- Check the ONU has light. Without signal, the OLT can't see it.
- Is it already authorized? Search for its serial on Configured. If it's on the OLT but not in CoreSync, press Discover ONUs on the OLT's Management tab.
- Pre-registered but still waiting? Look for a Failed reason on the Pre-registered tab.
The ONU is online but the customer has no internet.
- Open the diagnosis and look at the linked subscriber's session. No session usually means a login or billing problem, not the fibre.
- Check the subscriber is active and paid, then their RADIUS logs. See Routers, RADIUS and sessions and Troubleshooting.
The ONU never contacts the ACS (no TR-069). See TR-069 and remote ONU setup.