All guides
Start here
Customers and billing
Hotspot
Network
- Devices, OLTs and ONUs
- Routers, RADIUS and sessions
- TR-069 and remote ONU setup
- Zones, nodes, topology and the map
Support and messaging
Your team and settings
For your subscribers
Troubleshooting
On this page
- How a move works
- Set up before you import
- Prepare your file
- Upload and map your columns
- Match old names in Transform
- How each customer's status is decided
- Discounts and agreed prices
- Preview, then import
- Read the result and fix failed rows
- Check it against your old system
- Payments from your old system
- Common mistakes
- If it doesn't work
How a move works#
Moving to CoreSync means four things, in this order:
- Set up your plans, payments and SMS, so customers can pay and get warned from the first minute.
- Import your customers from a CSV file exported from your old system.
- Check the result against your old system, customer by customer where it matters.
- Point your routers at CoreSync, so it decides who gets internet.
This page covers the first three. Pointing routers at CoreSync is in Routers and RADIUS. For the bigger picture, such as running both systems side by side for a week, read the migration playbook.
Set up before you import#
Open Getting started in the menu. It lists the setup steps in order and ticks each one off by itself when the work is done. See Getting started.
- Create your Zones, and your Nodes if your network has them. You can also let the import create nodes for you (see below).
- Create your Speed profiles and Service plans. Make one plan for every package your old system sells, at the same price. See Plans and renewals.
- Connect your payment gateway in Settings → Payment, for example your M-Pesa paybill. See Payments.
- Connect your SMS provider in Settings → Notifications, and read your reminder templates. See Communications.
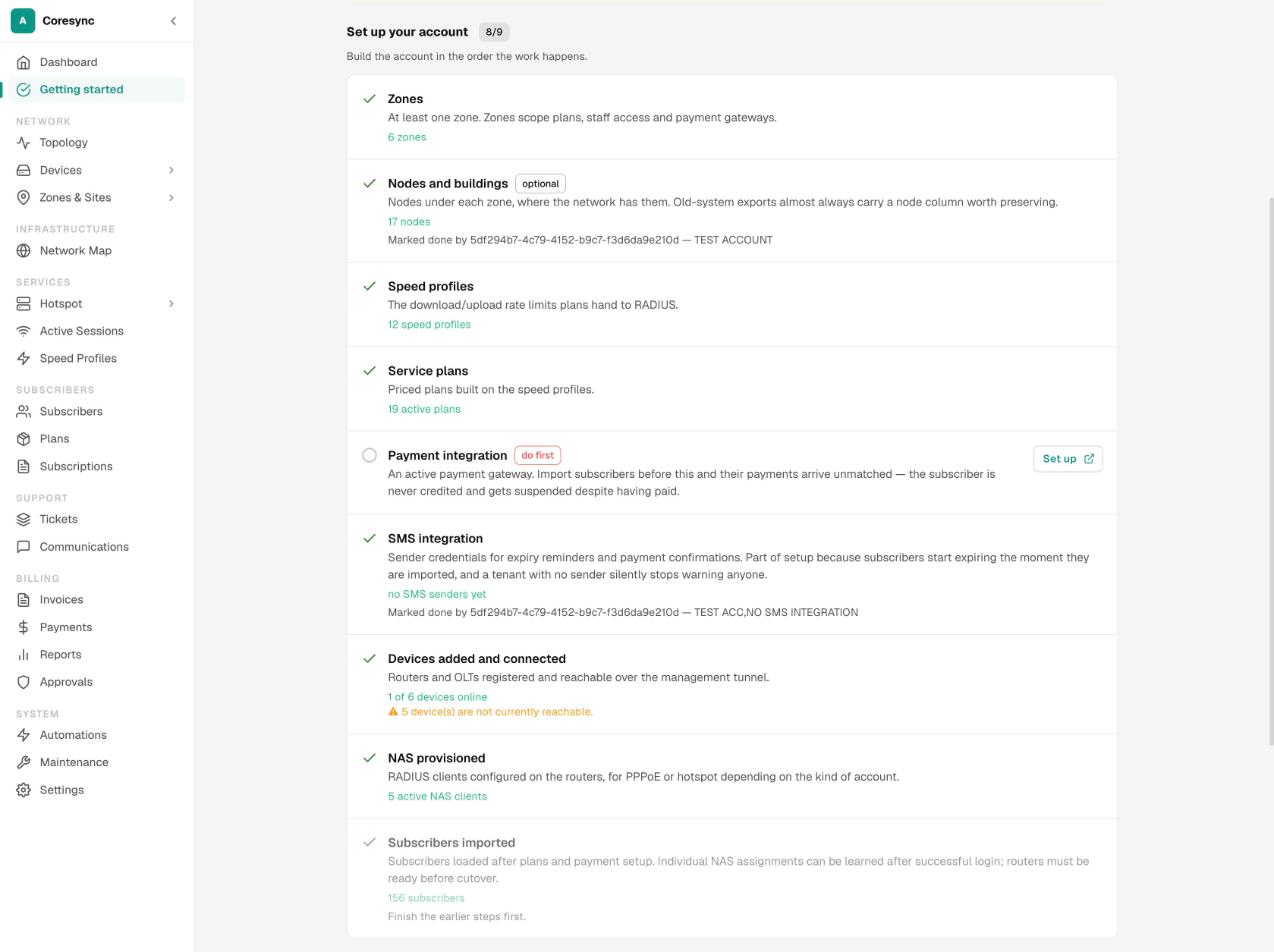
Your routers don't need to be ready to import. They need to be ready before you switch them over to CoreSync.
Prepare your file#
Export your customers from your old system as a CSV file. The first row must be the column names, with one customer on each row after it. CoreSync guesses which column is which from the names, and you can correct it.
| Column | What to put in it |
|---|---|
| Name | Required. A full name, or separate first and last names. |
| Phone | The customer's phone, for example 0712 345 678. |
| Account number | The account number customers type when they pay. Keep it, so their payments still find them. |
| Username and password | Their PPPoE login. Keep both exactly as they are, so their routers keep logging in. |
| Package | The plan name in the old system. You match it to a CoreSync plan in the next step. |
| Expiry | When their current period ends. This is the most important column. |
| Node | The building, estate or site they're connected from, if you track it. |
| Discount | Only a discount your old system recorded for that account. See below. |
| Status | Only needed to mark churned customers as TERMINATED. |
2026-12-05 23:59. A date with no time expires at 00:00, the very start of that day. And a date like 05/11/2026 is read month first, as 11 May, not 5 November.Leave out hotspot customers. CoreSync won't import them as subscribers: it tracks hotspot customers from what they buy.
Upload and map your columns#
Mapping tells CoreSync which column in your file holds which detail.
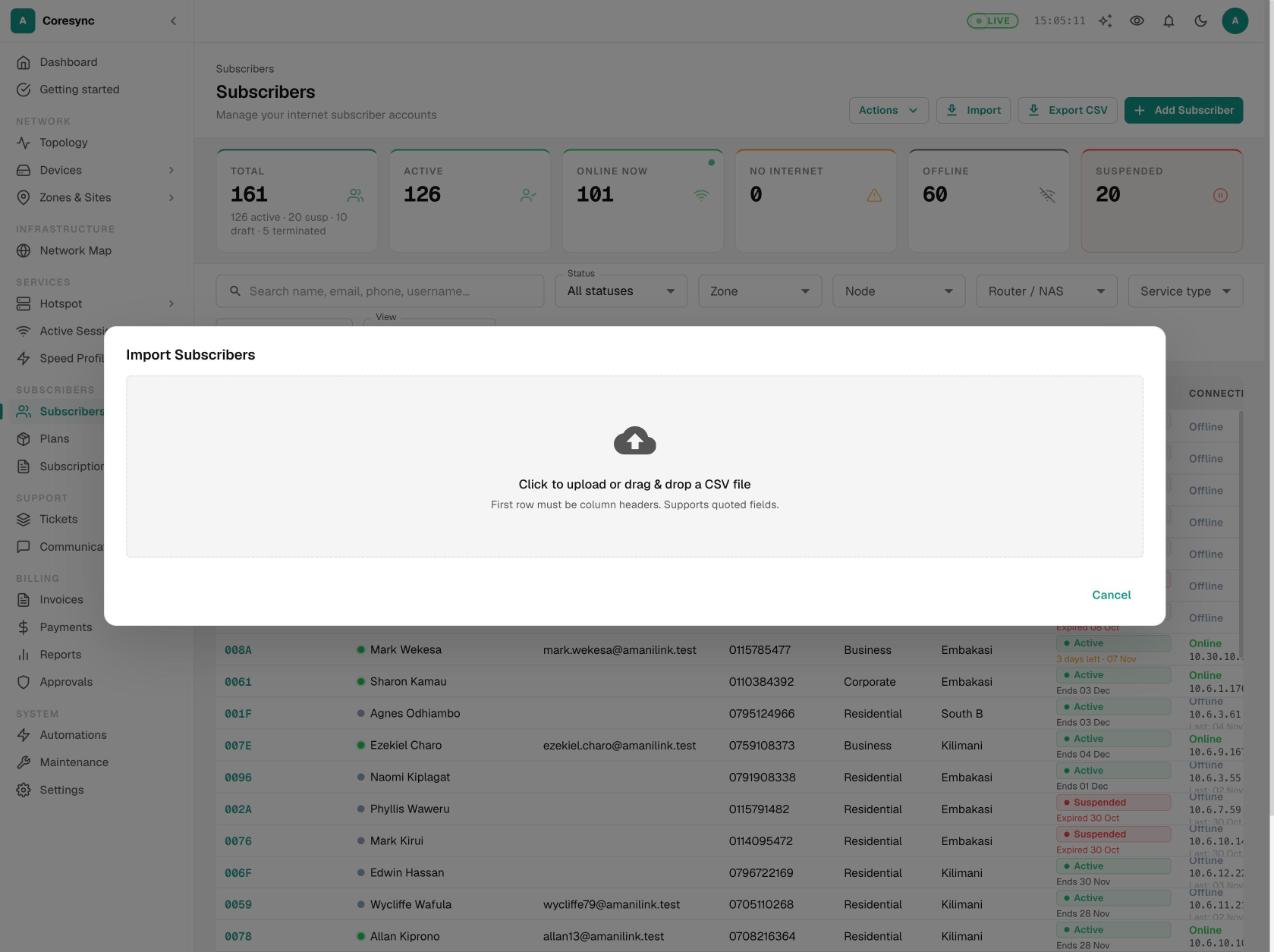
- Open Subscribers and press Import.
- Drop your CSV file on the box, or click it to choose the file. The file name and the number of rows appear at the top.
- On Map Fields, set the defaults for every row: Connection Type (PPPoE or Static IP), NAS / Router Device, Zone and Billing Cycle. A column in your file wins over the default.
- Go down the table. For each System Field, check the CSV Column next to it and the Sample Values from your file. Pick another column, or clear it to skip the field.
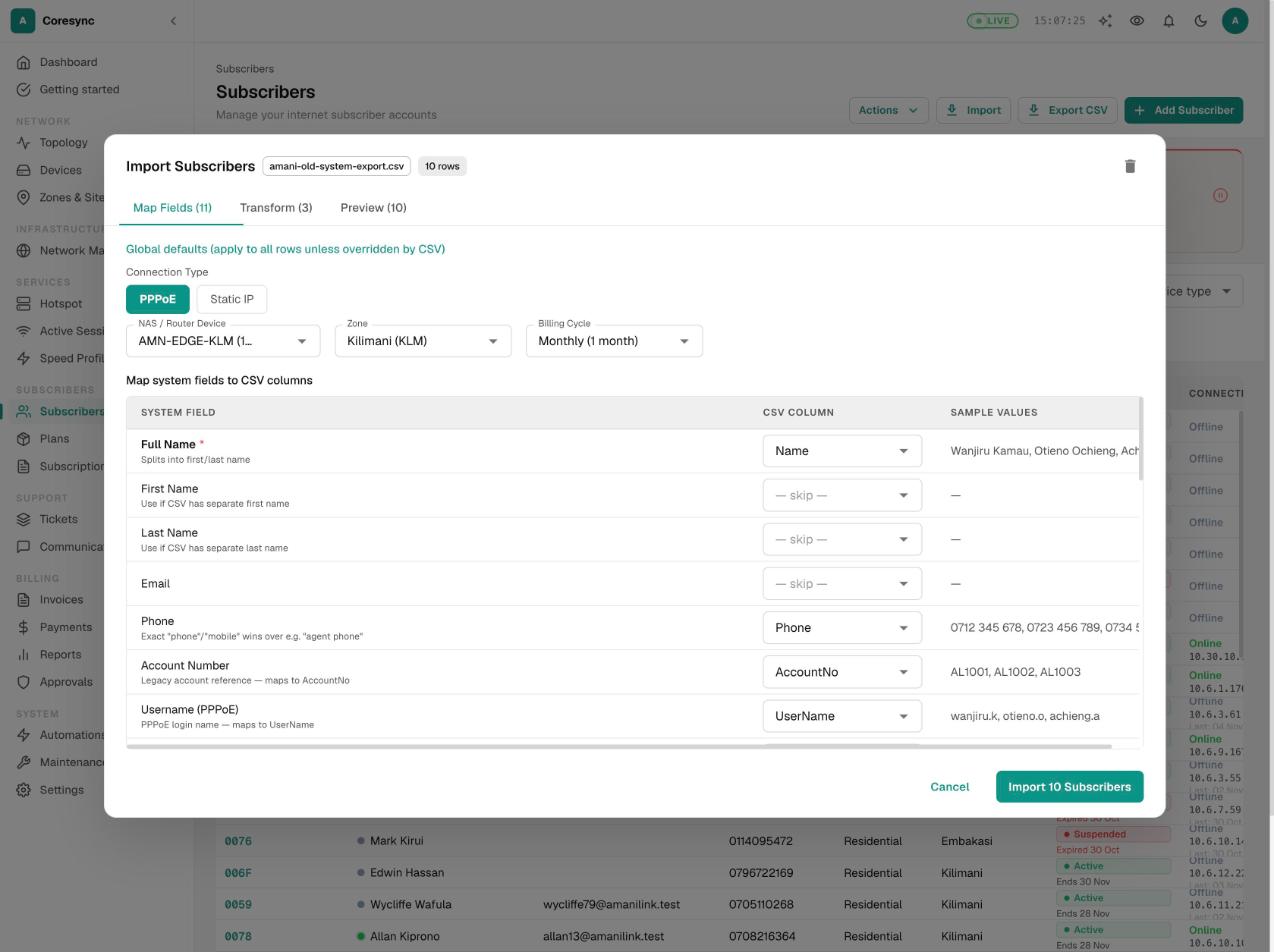
- Make sure Subscription Expiry is mapped. If it isn't, a red warning shows at the top.
Match old names in Transform#
Your old system has its own names for packages, routers, zones and nodes. Transform lists every name it found in your file, so you can match each one to what it is in CoreSync. CoreSync matches the ones it can by name. You only deal with the rest.
- Open the Transform tab.
- Under Service Plans, pick a plan for every package name. If your file has speeds instead of package names, map Download Speed and Upload Speed, and pick a plan for each speed under Speed Plans.
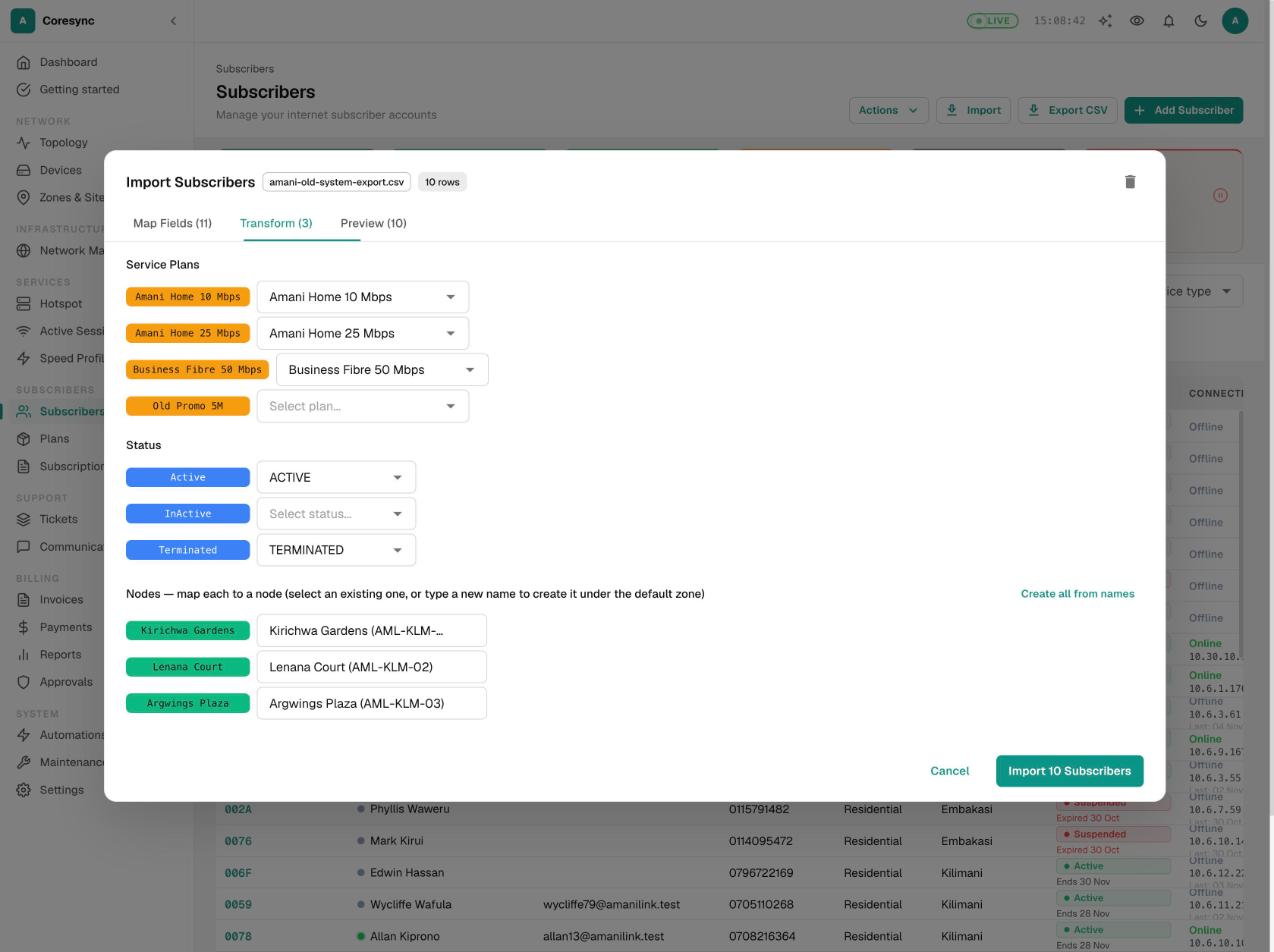
- Under Status, set churned customers to TERMINATED. For everyone else, the expiry date decides (see the next section).
- Under NAS Devices, Zones and Nodes, pick the matching router, zone or node.
- For a node that doesn't exist yet, type its name to create it, or press Create all from names. New nodes go under the Zone you set on Map Fields.
How each customer's status is decided#
CoreSync doesn't trust the old system's status label. It decides from the expiry date:
| In your file | In CoreSync |
|---|---|
| Expiry still ahead | Active. They keep their internet until that date. |
| Expiry already passed | Suspended. No internet until they pay. |
| Status TERMINATED | Terminated. No access, whatever the date says. |
| No expiry, with a status | The status you mapped, for example Draft for an account that never had service. |
The window is Access for New Subscribers in Settings → Subscriber. See Settings.
Discounts and agreed prices#
Some customers pay less than the plan price because you agreed it with them. Two columns carry that over:
- Discount: the amount off the plan price, for example 300. The customer's price becomes the plan price less the discount. Their Timeline records the discount it came from.
- Monthly Amount: the customer's price itself, for example 2,000. It replaces the plan price for that customer. If both are mapped, Monthly Amount wins.
Reminders, invoices, payment prompts and renewals all use that price from then on. To change it later, see Plans and renewals.
If your file has an Updates column, as Vinea exports do, CoreSync reads each account's latest recorded discount from it without you mapping anything.
Watch the automatic mapping here. A column called Amount, Price or Fee is mapped to Monthly Amount. If that column is really the customer's last payment, clear it.
Preview, then import#
The preview shows what CoreSync will create, before anything is saved.
- Open the Preview tab. The blue line at the top counts the whole file: how many will be Active, Suspended, Draft and Terminated, and how many have a discount.
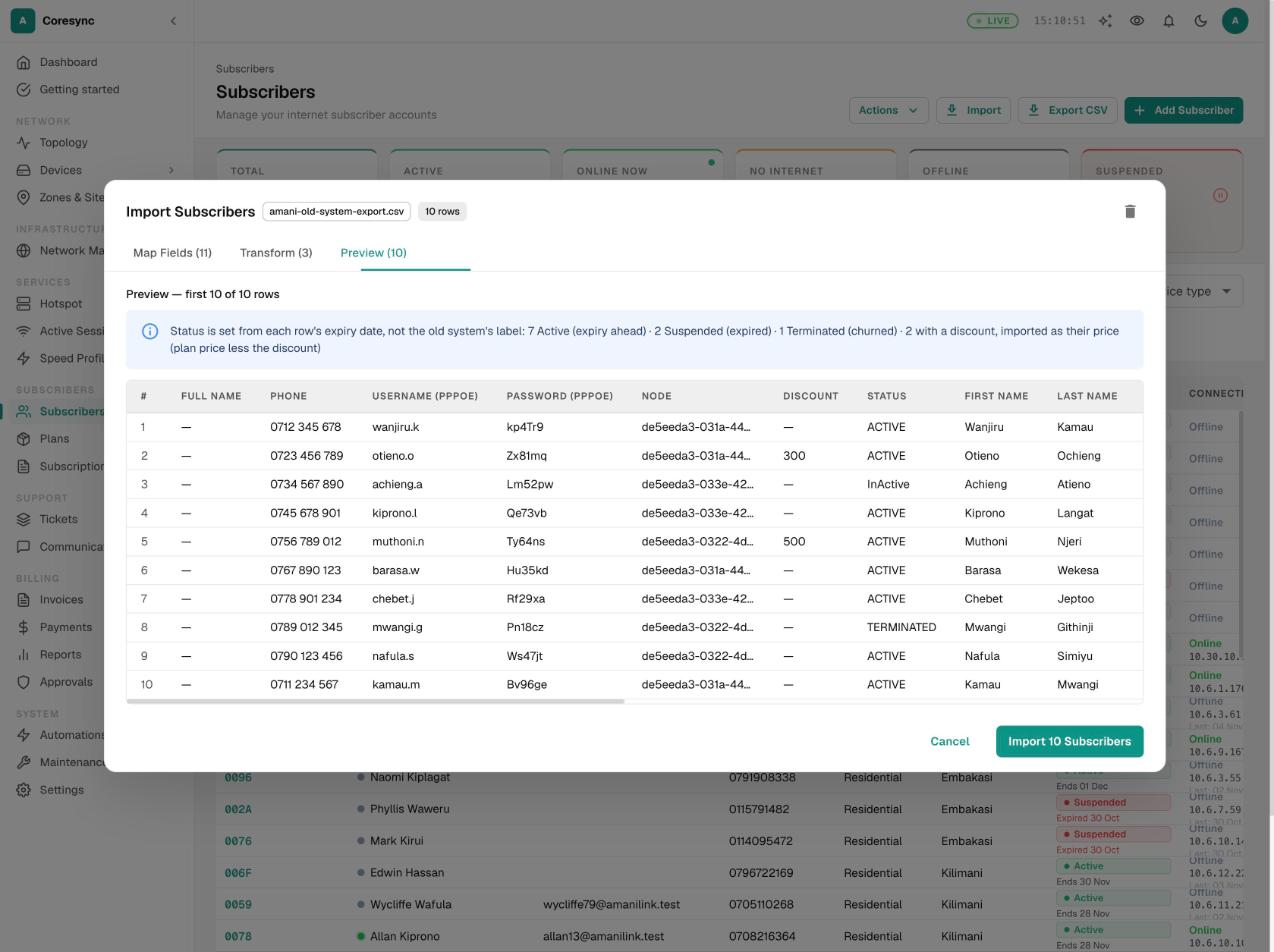
- Check those numbers against your old system. CoreSync works them out from the dates and statuses you mapped, so if they look wrong, go back to Map Fields or Transform and fix the mapping before you import.
- If anything is missing, a button at the bottom names it and takes you back to Map Fields.
- When it's right, press Import with the number of subscribers, for example Import 850 Subscribers.
- The import runs in the background and shows its progress. You can leave it open, or close it: it keeps going.
Read the result and fix failed rows#
When the import finishes, it says how many imported and how many failed. Each row stands alone: one failed row never undoes the others.
- Read the list of rows that did not import. It shows the row, the account, the name and the reason, for example a username that already exists.
- Press Download failed rows (CSV). You get only those rows, with your original columns and the reason added.
- Fix the rows in that file, then import that file on its own.
- Press Done.
Check it against your old system#
An import that didn't error isn't the same as a correct one. Check before you switch your routers over.
- On Subscribers, compare the Total, Active and Suspended cards with your old system and with the preview.
- Open a few customers from each plan and node. Check the plan, the expiry date and time, the price and the node against the old system. See Subscribers.
- Open Getting started and look under Confirm it works. RADIUS verified turns green when every active customer has a login.
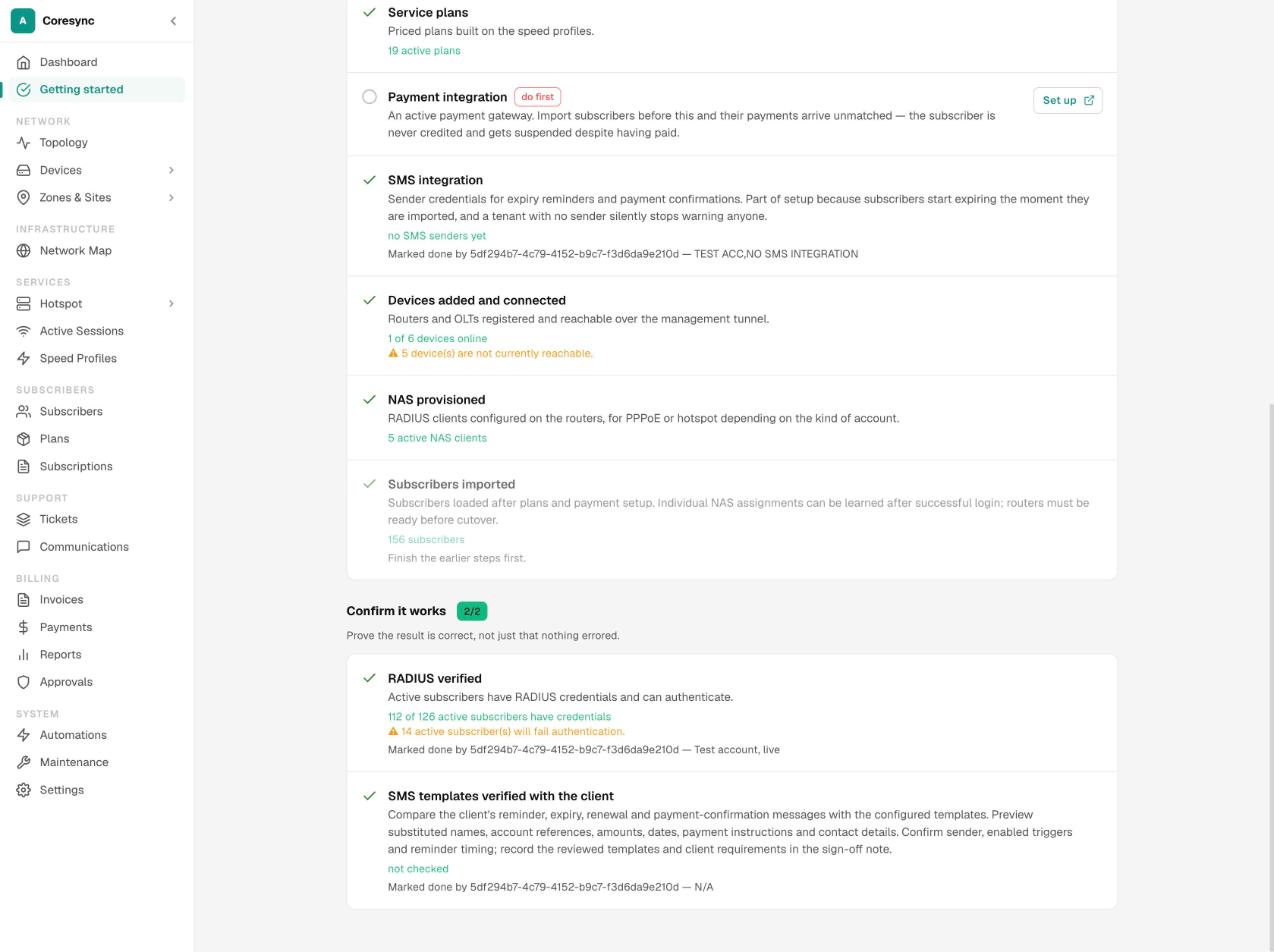
- If Avitech ran your migration, you also see Migration reconciled against the export. It turns green once every customer in your export has been checked: present, right status, right plan, right expiry, right node, and able to log in if active.
- Switch your routers over. Then watch Active Sessions fill up as customers reconnect.
For the first days, look at the unmatched payments on the Payments page every morning. A customer paying with an old reference that didn't come across shows up there. Match the payment to them. See Payments.
Payments from your old system#
Don't load your old payment history through Payments → Import M-Pesa. That button treats every row as money arriving now. It credits the customer, renews them from today and sends the payment SMS, exactly like a live M-Pesa payment. Your imported expiry dates already include what they paid.
If you want your old payment history kept in CoreSync for your records, talk to Avitech before you do anything.
Import M-Pesa is for real payments CoreSync missed, for example ones paid to your old system after you took the export. Check each one isn't already in the expiry you imported. A receipt already in CoreSync is skipped, never counted twice. See Payments.
Common mistakes#
- Importing before payments and SMS are connected. Payments go unmatched, paying customers get cut off, and nobody gets warned before their expiry.
- Leaving Subscription Expiry unmapped. Everyone gets a few hours of access, then is suspended.
- Dates without a time, or day first. Customers expire at 00:00, or in the wrong month. Use
2026-12-05 23:59. - Leaving a package unmatched in Transform. Those customers land on a plan CoreSync picked, at the wrong price and speed.
- Working out discounts from payments. Only carry over a discount the old system recorded. Paying less means fewer days, not a lower price.
- Mapping the last payment as Monthly Amount. A column called Amount is mapped there automatically. Clear it if it isn't the customer's monthly price.
- Importing an old payment statement as live payments. Every customer on it is renewed from today and texted that their payment arrived.
- Re-importing the whole file. Import only the failed rows file.
- Pressing Create all from names to try it out. It creates the zones or nodes for real.
If it doesn't work#
| What you see | What to do |
|---|---|
| No active payment gateway is configured… | Connect your gateway in Settings → Payment, then import again. |
| Missing: At least one name (Full, First, or Last) | Map a name column on Map Fields. |
| Pick a default zone first so new nodes … have a zone. | Choose a Zone in the defaults on Map Fields, then create the nodes. |
| The NAS / Router Device list is empty | No routers have been added yet, or your role can't see devices. Ask your admin. |
| Rows failed with Username already exists | That customer is already in CoreSync, or the login is taken. Search for them before you change anything. |
| Customers are Active but can't connect | Your routers still use the old system. See Routers and RADIUS, then check RADIUS verified on Getting started. |
| Customers were cut off a day early | The expiry column had dates with no time. Fix the expiry on their subscriber page. See Plans and renewals. |