All guides
Start here
Customers and billing
Hotspot
Network
- Devices, OLTs and ONUs
- Routers, RADIUS and sessions
- TR-069 and remote ONU setup
- Zones, nodes, topology and the map
Support and messaging
Your team and settings
For your subscribers
Troubleshooting
On this page
What TR-069 does for you#
TR-069 lets CoreSync manage a customer's ONU (their home router) from the office. The ONU checks in with a server called the ACS. Once it does, you can see its settings and change them without a site visit.
| You want to | Where |
|---|---|
| Set or change the customer's PPPoE login, or move them to a static IP | The ONU's TR-069 tab, Internet / PPPoE → Edit |
| Change the Wi-Fi name or password | The ONU's TR-069 tab, WiFi → Edit |
| Add, edit or remove a WAN (for example a hotspot or IPTV WAN) | The ONU's WAN Connections tab |
| Reboot the ONU, or test the customer's line from it | The ONU's TR-069 tab: Reboot, and Troubleshoot from the router |
| Upgrade its firmware | The ONU's TR-069 tab, Firmware |
| Do any of this to many ONUs at once | ONUs → Fleet Push |
Two things decide how fast a change lands:
- The ONU checks in by itself. CoreSync sets every ONU to check in every 2 hours, and an ONU also checks in each time it boots.
- CoreSync can wake the ONU up. When the ACS can reach the ONU, your change is applied at once and you see Applied on the device. When it can't, you see Queued for next check-in, and the change waits until the ONU next checks in.
Connect your ACS#
Do this once, before anything else. Open Settings → ACS / TR-069. It has three tabs: Profiles, Firmware and Devices. The section only shows when your ISP has CoreSync's network features turned on.
- On the Profiles tab, choose how you want to run the ACS. Platform Managed means CoreSync runs one for you. Self Hosted means you already run your own GenieACS.
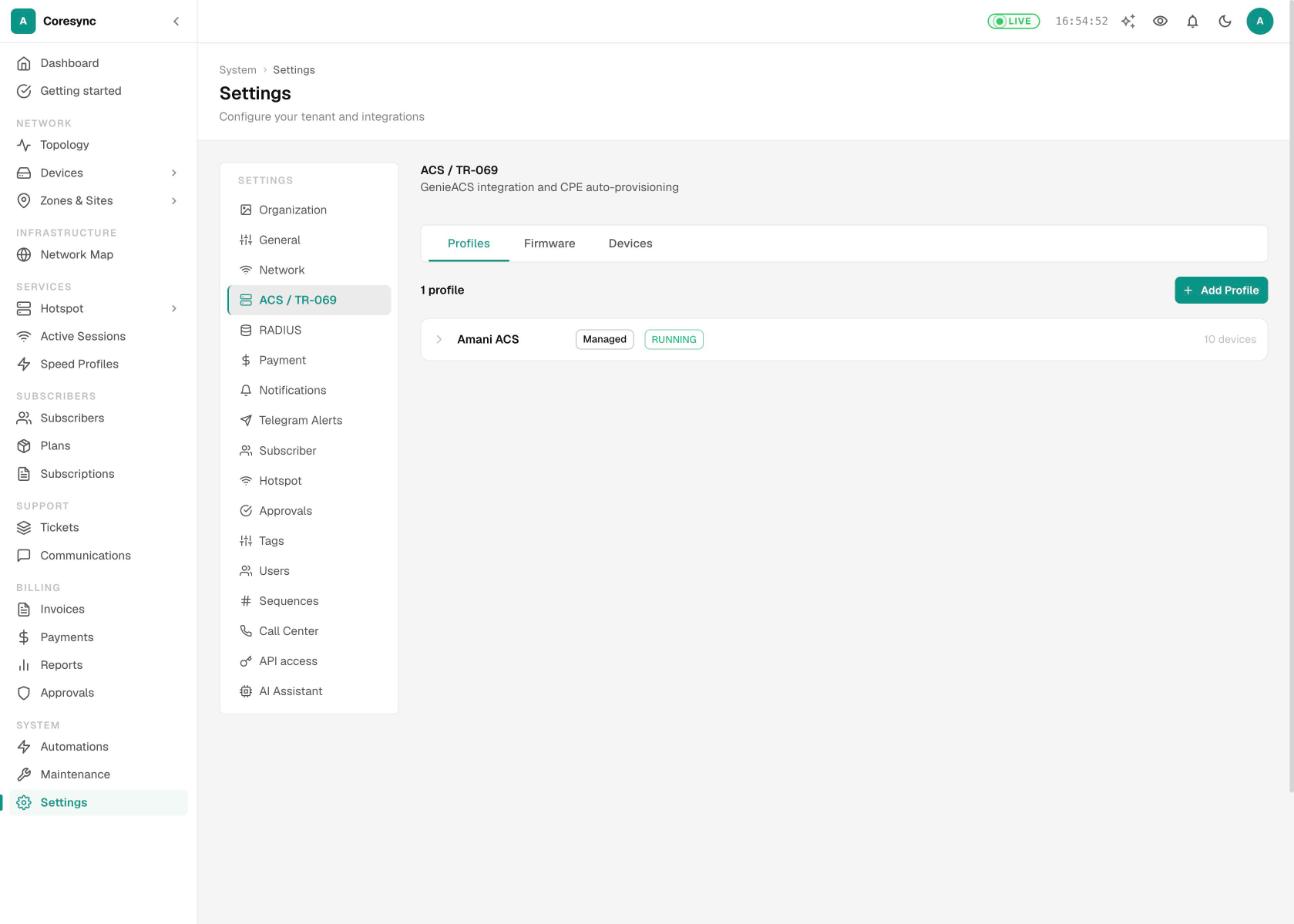
- For Platform Managed, press Provision ACS. CoreSync sets up your ACS and adds a profile for it.
- For Self Hosted, type your NBI URL, CWMP URL, NBI Username and NBI Password, then press Connect ACS.
- Click the profile to open it. Check its status is RUNNING. Press Test to check CoreSync can reach it.
- Note the CWMP URL. That's the ACS address your ONUs check in to. CoreSync puts it on ONUs for you when it sets them up through the OLT. You only type it yourself on an ONU's own web page.
Have more than one ACS? Add the others with Add Profile, and press Set Default on the one new ONUs should use.
The Devices tab lists every device that has checked in to your ACS, with its serial and Last Inform time. CoreSync matches these to your ONUs by serial number every 10 minutes. Press Sync Now if you don't want to wait. If an ONU checked in before CoreSync knew it from the OLT, it can show up twice. Merge Duplicates folds the extra copy into the real ONU.
The Firmware tab is your firmware library. Upload a file, or use Fetch from URL, so you can upgrade ONUs from their TR-069 tab later.
Bring ONUs onto TR-069#
An ONU needs two things before it can check in: the ACS address, and a management VLAN that gives it a way out to the ACS. CoreSync can set both through the OLT. Pick the way that fits:
| When | What to do |
|---|---|
| You're authorizing a new ONU | In Authorize ONU, turn on TR-069 / ACS, then pick the ACS Profile and the TR-069 VLAN (optional). See Devices, OLTs and ONUs. |
| One ONU that's already working | Open the ONU, go to the Management tab, and use the TR-069 Profile card (steps below). |
| Many ONUs at once | ONUs → Fleet Push, operation Onboard to TR-069 (ACS + mgmt VLAN). |
| An ONU the OLT can't configure (some third-party ONUs) | Log in to the ONU's own web page. In its TR-069 or CWMP settings, turn it on, type your CWMP URL as the ACS URL, and turn on periodic inform. |
To set up one ONU from its page:
- Open the ONU (from Devices → ONUs) and go to the Management tab.
- On the TR-069 Profile card, press Edit.
- Pick the ACS Profile and the Management VLAN (for TR-069), then press Apply. CoreSync sends the settings to the ONU through its OLT and shows the progress.
- Press Verify on ONU. It reads the ONU's own TR-069 settings back from the OLT. Check the URL is your CWMP URL and the VLAN is your management VLAN.
- Wait for the ONU to check in. Rebooting it makes it check in straight away. Within 10 minutes of its first check-in, CoreSync links it and the TR-069 tab fills in.
The ONU's TR-069 tab#
This is where you see what the ONU itself reports, and change it.
- Open the ONU from Devices → ONUs, or from the subscriber's page.
- Go to the TR-069 tab. The top shows the model, software version, serial and Last inform, the last time the ONU checked in.
- Press Refresh to read fresh settings from the ONU. It takes a few seconds.
What's on the tab:
| Part | What it shows or does |
|---|---|
| Management (ACS) | The ACS URL the ONU uses, its check-in setting and interval. |
| Internet / PPPoE | The customer's internet connection: status, PPPoE username, the IP it got, gateway, DNS and the last error. |
| WiFi | Each Wi-Fi network (SSID), on or off, channel and security. |
| LAN & DHCP | The ONU's own address on the customer's side and its DHCP range. |
| Troubleshoot from the router | Tests the ONU runs itself: Ping, Traceroute, Download test and Upload test. |
| Advanced — all parameters | Every setting the ONU reports, with a filter. Settings the ONU allows to change have an edit button. |
| Device Queue | Changes waiting for the ONU to check in, and faults that explain why an earlier change failed. |
| Firmware | Pick a file from your library and press Upgrade. |
The buttons at the top: Ping checks the ONU answers. Reboot restarts it, and the customer drops for 1–2 minutes. Factory wipes it back to factory settings.
Every Edit opens a small form. Only the fields you change are sent. Press Apply, then read the result: Applied on the device, or Queued for next check-in.
Seeing the tab needs View Network Devices. Changing anything, rebooting and running tests need Edit Network Devices.
Set a customer's PPPoE or static IP#
The rule: RADIUS first. An ONU can only log in with a PPPoE username and password that RADIUS also has. If you put a login on the ONU that RADIUS doesn't know, the customer gets rejected. CoreSync's subscriber pushes keep the two in step for you: they update the subscriber and RADIUS first, then the ONU.
Link the subscriber to the ONU first. Then, from the ONU:
- On the TR-069 tab, find Internet / PPPoE and press Edit. The Edit connection form opens with the linked subscriber's name, status and current type.
- Under Connection type to push, choose PPPoE or Static IP.
- The fields are filled in from the subscriber. Leave them as they are to re-push the same login. If you change them, CoreSync changes the subscriber and RADIUS too, and keeps the old login in the subscriber's history.
- Leave Drop active session so it re-authenticates ticked, so the ONU logs in again with the new details.
- Press Push PPPoE to ONU (or Push Static Config to ONU). If CoreSync warns you, read each point, then press Push.
- If the ONU has no WAN of that type yet, CoreSync creates one. You may see Push in progress — waiting for the device to create the WAN while it retries.
You can also do it from the subscriber side:
- One subscriber: on Subscribers, open the row menu and choose Set to PPPoE (or Re-push PPPoE). The line under it tells you what will happen: Pushes to the ONU, or RADIUS only when there's no TR-069 ONU linked.
- Many subscribers: on Subscribers, press Actions → Set to PPPoE (bulk)…. Filter by status, current type, zone or router, keep Also push PPPoE credentials to each linked ONU (TR-069) ticked, and press the Set … to PPPoE button. It's safe to run again.
- While linking an ONU: in the subscriber's Edit form, pick the ONU under Link ONU (optional) and tick Provision PPPoE now.
- A whole fleet: ONUs → Fleet Push, operation Push PPPoE credentials. Each ONU gets its linked subscriber's RADIUS login. ONUs with no subscriber are skipped.
More on subscribers and their logins is in Subscribers, and on RADIUS in Routers, RADIUS and sessions.
Change the customer's Wi-Fi#
- On the ONU's TR-069 tab, find the network under WiFi and press Edit.
- Change the SSID, the WiFi Password, Enabled or the Channel (0=auto). Leave the password blank to keep the current one.
- Press Apply.
WAN connections#
The WAN Connections tab lists every WAN on the ONU: its name, type, mode, VLAN, IP and status. It works for ONUs on your ACS, and for VSOL ONUs through their OLT.
- Press + Add WAN, or Edit on a row.
- Choose the Type: PPPoE, or IPoE (DHCP / Static) with its Addressing.
- Set the Service VLAN, or leave it blank to use the ONU's service VLAN. Set NAT and Enabled.
- Press Add WAN (or Save when editing). To delete a WAN, press Remove, then Remove WAN. The ONU's other WANs stay.
Voice and management WANs are protected, so you can't remove them here. That keeps the ONU reachable.
Test a customer's line from their ONU#
When a customer says the internet is slow or a site won't open, run the test from their ONU. That rules out their phone or laptop.
- On the ONU's TR-069 tab, find Troubleshoot from the router.
- Pick Ping or Traceroute and type a Host or IP. For a speed test, pick Download test or Upload test and type a file or upload address.
- Press Run. Ping shows replies, packet loss and times. A speed test shows the speed and how much it moved.
If an ONU never checks in#
Signs: the ONU has no TR-069 tab, the tab says This ONU is not linked to the ACS yet, the banner at the top of the ONU page says Not registered in ACS or Not yet checked, or its serial is missing from Settings → ACS / TR-069 → Devices. Work down this list:
- Is the ONU online? Check it on ONUs. An ONU with LOS or a power failure can't check in. Fix the fibre or power first.
- Does it have a TR-069 profile? On the Management tab, the TR-069 Profile card should name your ACS profile. If it says No profile assigned, set one (see above).
- Does the ONU have the right settings? Press Verify on ONU. The URL must be your CWMP URL, and the VLAN your management VLAN.
- Can the management VLAN get out? This is the most common cause. The VLAN must be carried from the ONU through the OLT and up the OLT's uplink to your router. Your router needs an address on that VLAN, and the VLAN needs a way to the internet. The ONU also needs an IP address on it.
- Third-party ONU? Check its own web page: TR-069 on, the ACS URL is your CWMP URL, periodic inform on.
- Reboot the ONU. It checks in when it boots. Then press Sync Now on the Devices tab, or wait up to 10 minutes.
- Still nothing? Contact Avitech support with the ONU's serial number and its OLT.
It checks in, but every change says Queued for next check-in. The ONU can reach the ACS, but the ACS can't reach the ONU to wake it. Your changes still land at the ONU's next check-in (within 2 hours), or straight away if you reboot it. Press Ping on the Device Queue to try again. If it never answers, tell Avitech support: the way back to your management network needs fixing.
A change didn't take. Look at the Device Queue. A fault there says why, for example a setting the ONU doesn't allow. You can cancel a queued task you no longer want.
The push says the device hasn't created the WAN yet. The ONU is probably offline. Check its Last inform, and push again once it's back.
More checks for a customer who can't connect are in Troubleshooting.
Common mistakes#
- Typing a PPPoE login straight onto the ONU. RADIUS doesn't know it, so the customer gets rejected. Link the subscriber and use Edit connection or Set to PPPoE.
- Pushing before the subscriber is linked. Without a linked subscriber, the Internet / PPPoE edit changes the ONU only. Link the ONU to the subscriber first.
- Pushing again and again. Queued for next check-in means it will land. More pushes only fill the queue.
- Shortening the check-in interval. Two hours is on purpose. Changes don't wait for it when the ACS can reach the ONU, and short intervals load the ACS.
- Disabling the old WAN too early. Leave Disable the old … WAN unticked until the new connection is up.
- Changing Wi-Fi without telling the customer. All their devices drop off.
- Factory resetting to fix a fault. It wipes the login and Wi-Fi. Reboot first.
- Stopping or removing the ACS in Settings. Every ONU loses remote management.