All guides
Start here
Customers and billing
Hotspot
Network
- Devices, OLTs and ONUs
- Routers, RADIUS and sessions
- TR-069 and remote ONU setup
- Zones, nodes, topology and the map
Support and messaging
Your team and settings
For your subscribers
Troubleshooting
On this page
How a ticket moves#
A ticket is one job: a fault, a complaint, a billing question or a new installation. It starts as new, someone works on it, and a supervisor checks the work before it closes.
| Status | What it means |
|---|---|
| NEW | Just raised. Nobody has picked it up yet. |
| ACKNOWLEDGED | Someone has seen it and is on it. |
| ESCALATED | Handed up to a more senior person. |
| RESOLVED | The work is done and waiting for a supervisor to check it. |
| FIX PENDING VERIFICATION | Waiting to be checked again, or sent back by a supervisor because the fix wasn't right. |
| CLOSED | Checked and finished. A closed ticket can't be reopened. |
Whoever does the work marks it resolved. Only someone with Close Tickets can close it. This way a technician never closes their own job without anyone checking.
Each ticket gets a deadline from its priority. Unless Avitech has changed them for your ISP, these are the standard times:
| Priority | Respond within | Resolve within |
|---|---|---|
| Critical | 15 minutes | 4 hours |
| High | 1 hour | 8 hours |
| Medium | 4 hours | 24 hours |
| Low | 8 hours | 3 days |
A ticket past its resolve time is overdue. It turns red in the list.
The ticket list#
Open Tickets under Support in the menu. The page has two views at the top: My Jobs and All Tickets. My Jobs is your own work. All Tickets is the whole queue.
Above the list are four cards. Click a card to show only those tickets. Click it again to show everything.
| Card | What it counts |
|---|---|
| Open | Every ticket that isn't resolved or closed yet. |
| Overdue | Open tickets past their resolve time. |
| To verify | Resolved tickets waiting for a supervisor to check and close. |
| Unassigned | Tickets nobody has been given yet. |
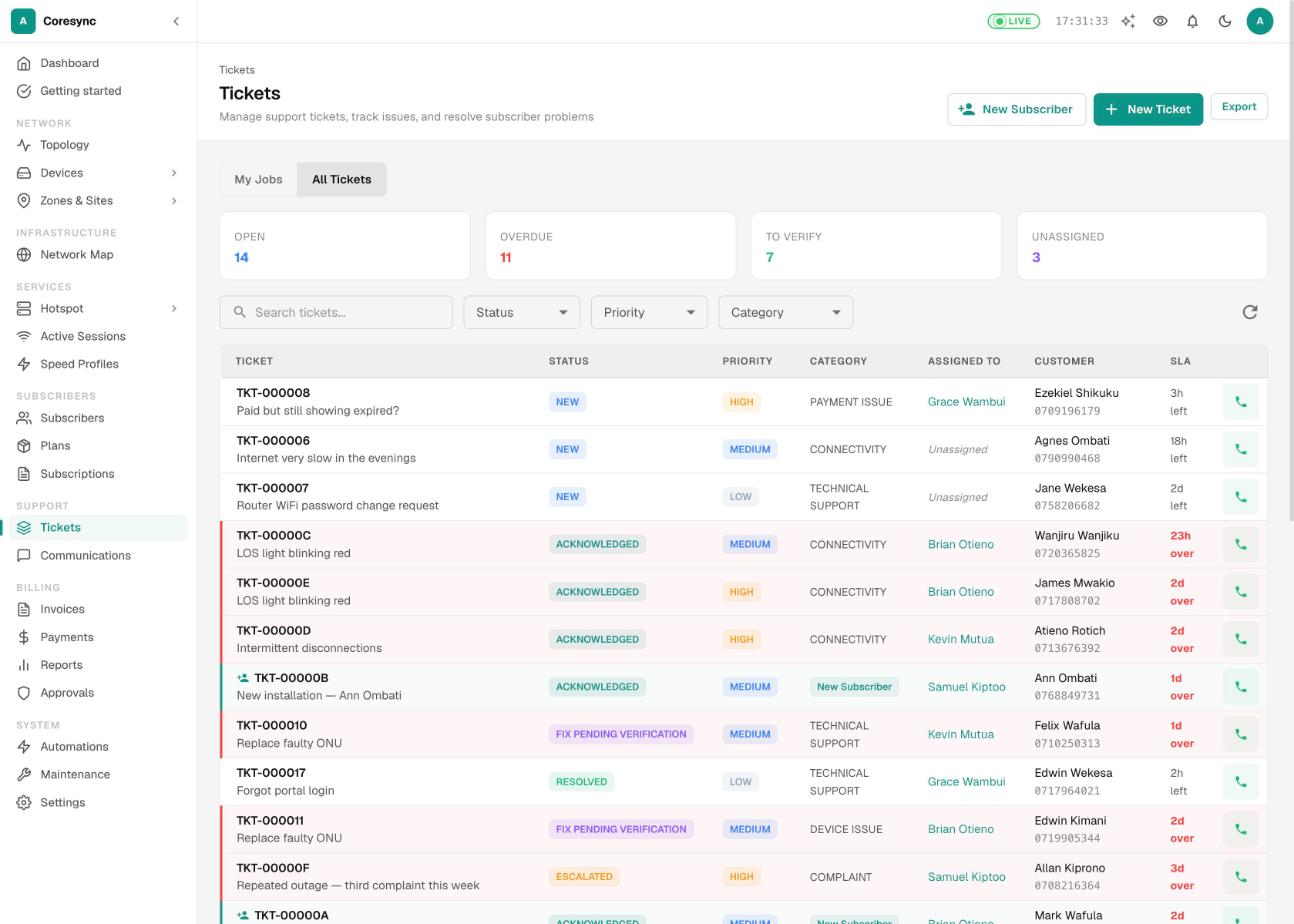
Use Search tickets... and the Status, Priority and Category filters to narrow the list. New installations show a New Subscriber label.
Click a ticket to open it. The ⋮ menu at the end of each row has quick actions: View Details, Edit, Change Status and Assign. If you can't see it, scroll the table to the right.
Raise a ticket#
Raise a ticket whenever a customer calls, walks in or emails about a problem, so nothing gets lost.
- On the Tickets page, press New Ticket. On a phone, press the round + button.
- Type a short Subject, such as "No internet since morning", and add details in Description.
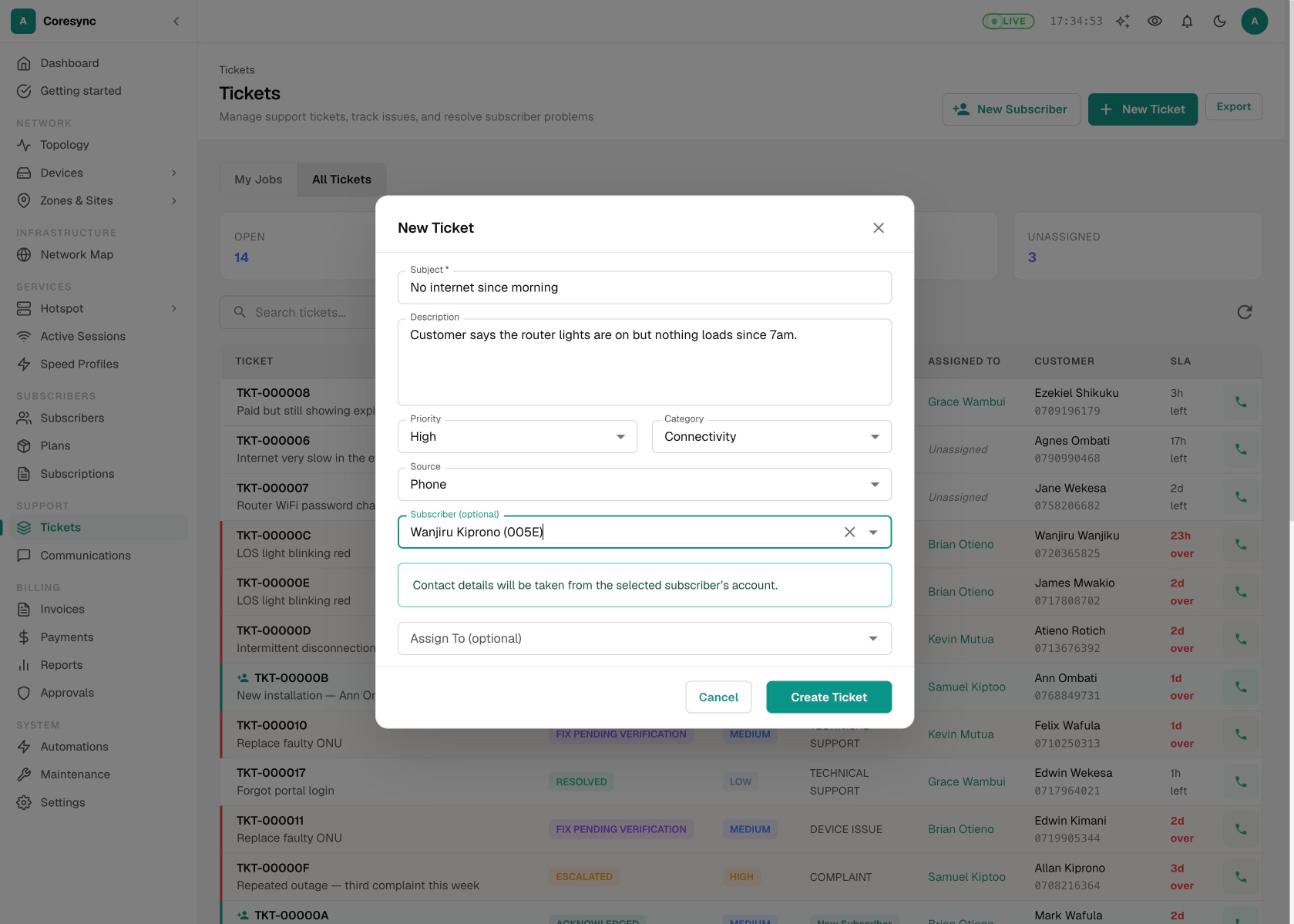
- Pick the Priority, the Category and the Source (how the customer reached you, for example Phone or Walk In).
- Under Subscriber (optional), search by name, account, phone, email or IP and pick the customer. Their phone and address then come from their account.
- No account? Fill in Contact name, Mobile and Site address / directions instead, so the technician has someone to call.
- Optionally pick someone under Assign To (optional), then press Create Ticket.
Assign and escalate#
Assigning gives the job to one person. They see it in My Jobs and get a notification in CoreSync.
- Open the ticket and press Assign. Or use Assign in the row menu on the list.
- Pick the person under Select user and press Assign.
If the job needs someone more senior, press Escalate, pick the person under Escalate to and press Escalate. The ticket shows who it was escalated to.
Work on a ticket#
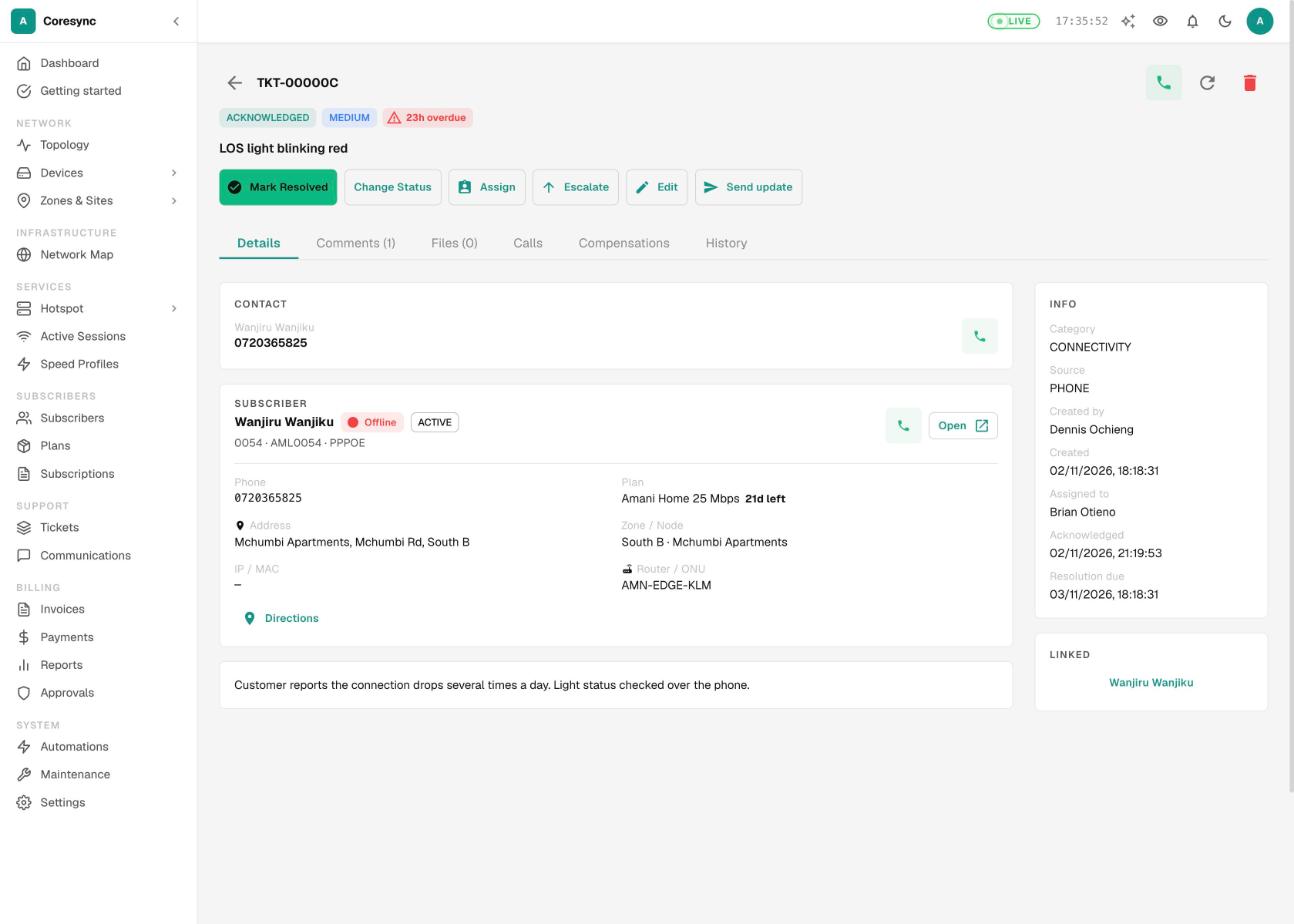
The ticket page has everything for the job. The buttons at the top change with the status.
| Tab | What's in it |
|---|---|
| Details | Who to call, the customer's account at a glance, the description and the resolution. A Directions button opens the address in Google Maps. |
| Comments | Notes for your team. Customers never see them. |
| Files | Photos and documents. On a phone you can take a photo straight from the camera. |
| Calls | Calls made on this ticket, if your ISP uses the CoreSync call center. |
| Compensations | Free days for a customer who lost service. See below. |
| History | Every change, who made it and when, including messages sent. |
To move a ticket along, press Change Status, pick the New Status and press Apply. The call button in the header rings the customer if your ISP uses the call center.
Edit a ticket and tell the customer#
Use Edit to fix the details, and Send update to tell people what's happening. Both buttons stay on a closed ticket too, in case you need to correct something or resend it.
- Open the ticket and press Send update. CoreSync fills the message with the ticket number, subject, status, technician, customer and address.
- Under Send to, tick Customer, Technician or Managers. Each one shows who it is, so you don't text the wrong person.
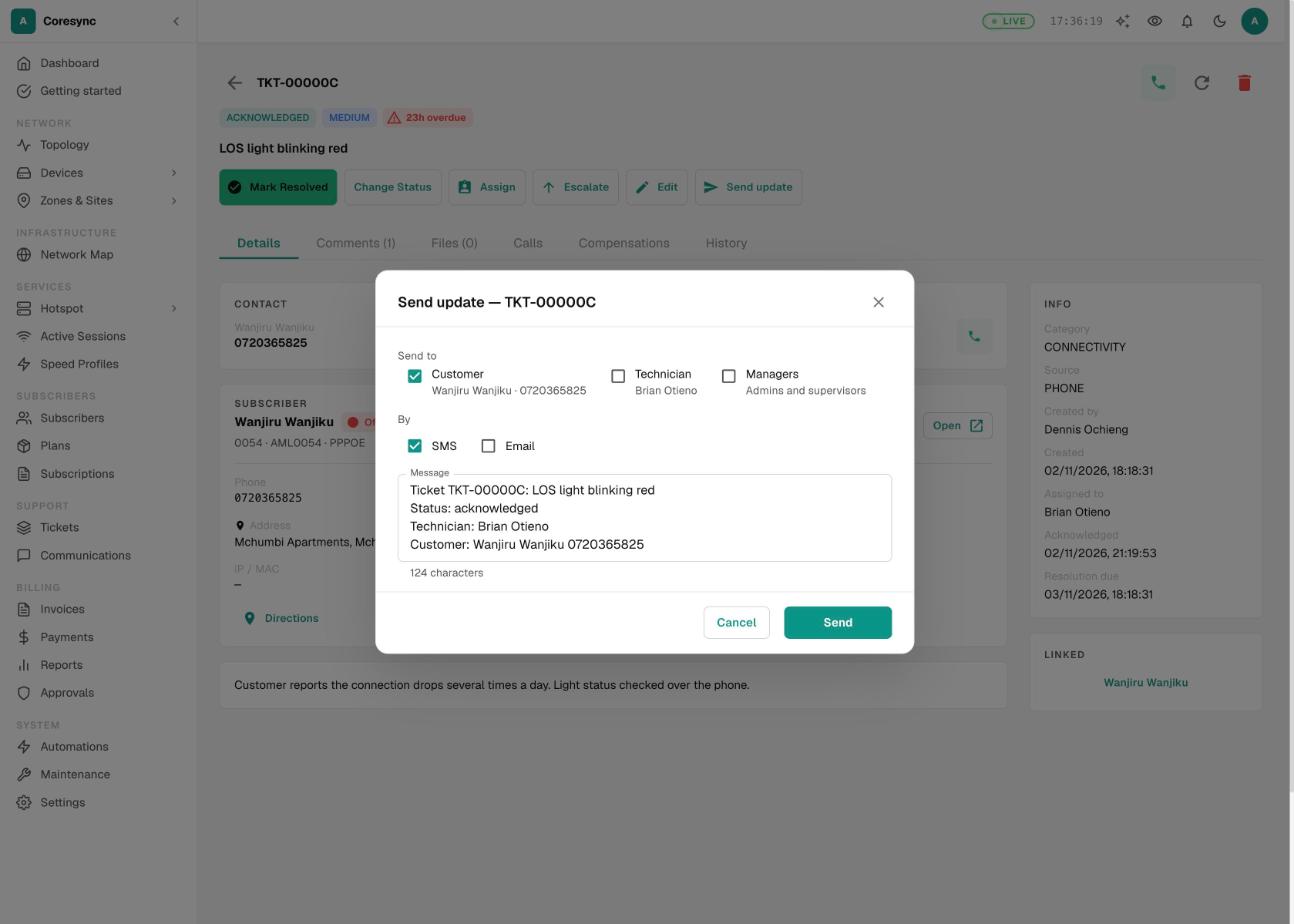
- Under By, tick SMS, Email or both. Change the Message if you like. Under the box you see how many SMS it will use.
- Press Send. CoreSync shows a line for each person: sent, or why not (for example "No phone number").
Managers means active staff whose designation is Manager or Supervisor, or whose role name contains "admin".
Edit opens the same form as a new ticket, with an extra part at the bottom: Tell people about this change (optional). Leave it empty and the edit is saved quietly. Tick someone and the button becomes Save & send.
Resolve and verify#
When the work is done, the person who did it marks it resolved. A supervisor then checks and closes it.
- The technician presses Mark Resolved, writes what they did under Resolution notes, and presses Apply. The ticket moves to To verify.
- Everyone who can close tickets gets a notification in CoreSync that it's waiting for them.
- The supervisor opens it, checks the resolution and any photos in Files, and presses Verify & Close.
- Not fixed? Instead, choose Change Status → FIX PENDING VERIFICATION and say why under Why is this going back?. The technician is told, and the ticket shows Sent back 1×.
Book a new installation (the intake sheet)#
Use a New Subscriber ticket when someone wants to be connected. Sales books it, the technician installs, and closing the ticket creates the customer's account.
- On the Tickets page, press New Subscriber. The category is set to New Subscriber for you.
- Leave Existing subscriber account blank. Fill in Package, Installation date, Client name, Mobile and Location.
- Press Create Ticket. CoreSync opens the ticket on its New Subscriber tab: the intake sheet.
- Fill in what you know: Customer, Login the customer will use, Location, Service, Equipment, Payment and Installation. You can save a half-done sheet with Save details and come back later.
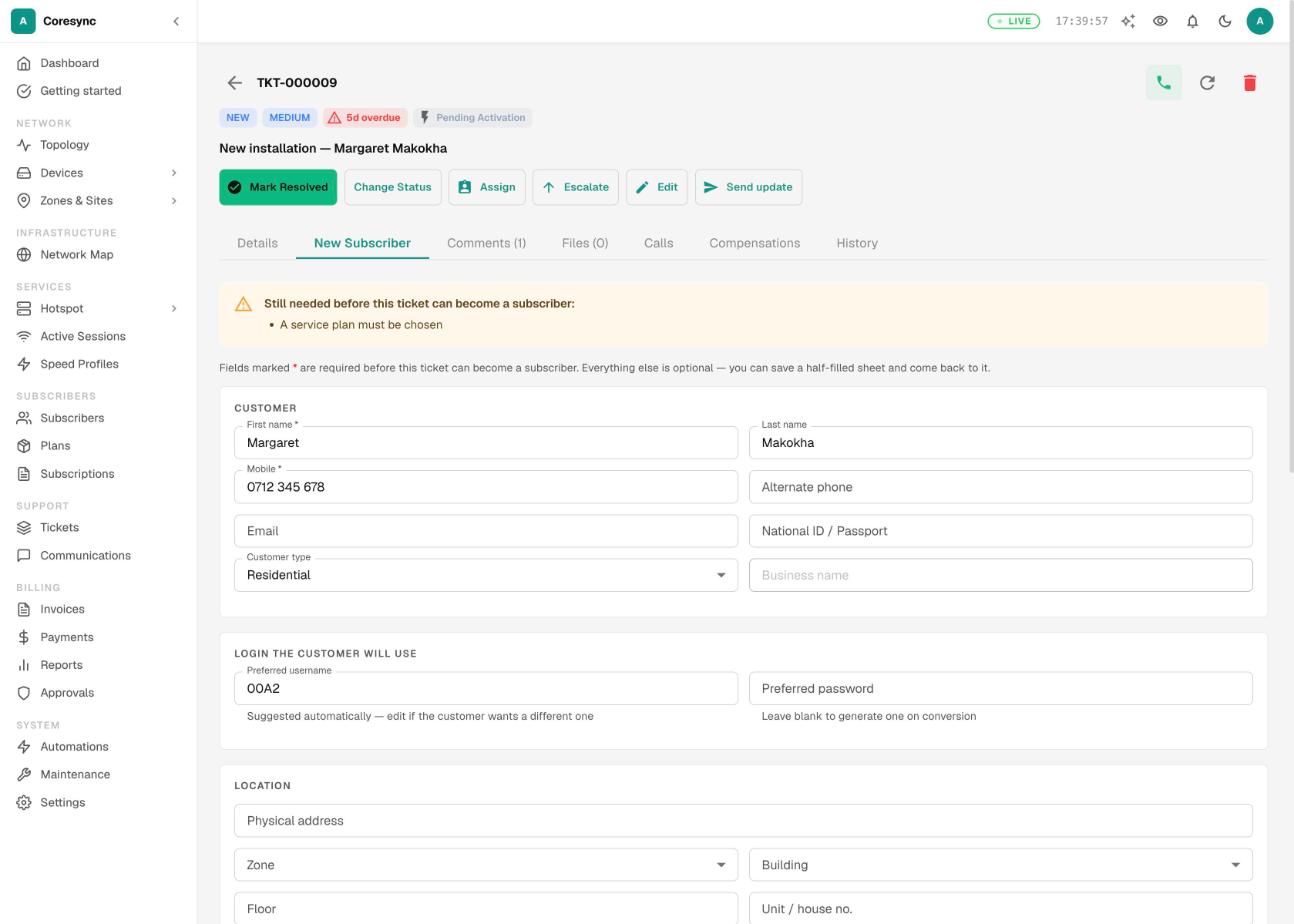
- The yellow box lists what's still missing. At least a first name (or business name), a mobile number and a package are needed.
- When the box says Ready to convert, closing the ticket creates the subscriber. Or press Convert now to create them straight away.
Converting creates the account, its plan and its internet login. Any installation fee and first payment you typed are recorded as two payments.
On the Details tab, the technician sees the customer, the package, the install date and the site. Capture GPS saves where the house is. Office details like the password and money stay on the intake sheet.
Give free days after an outage#
If a customer lost service, you can give them the time back from the ticket.
- Open the ticket's Compensations tab and press Add Compensation.
- Pick the subscriber, type the Outage Minutes and any notes, and press Add.
- Press Apply to extend their subscription, or Reject to drop it.
If your ISP has turned on approvals for compensations, Apply sends it for approval first. The time is added once an approver accepts it. See Approvals.
The technician's view (My Jobs)#
My Jobs is built for a phone in the field. Technicians who can't see the whole queue land here automatically.
- The counters show Open, Overdue, Due today and Done (7d).
- Jobs sent back for rework show a yellow banner and sit at the top of the list.
- Each card has a call button, GPS to save where you're standing, and Resolve.
- On site, press GPS to save the location.
- When the job is done, press Resolve. Write What did you do?, for example "Replaced the drop cable. Signal now -18 dBm."
- Press Attach a photo (optional) to take a picture of the finished work, then Mark resolved. A supervisor checks it next.
CoreSync comes with a Technician role. It can see and work on its own tickets, check customers and devices, and use the AI assistant. It can't assign, close or delete tickets. Supervisors can see each person's ticket work on their staff page. See Staff, roles and approvals.
Delete a ticket#
Delete a ticket that should never count, for example a duplicate or an installation the customer turned down. Deleting removes the ticket, its comments, files and history for good, and it drops out of reports.
- Open the ticket and press the red bin at the top right.
- Read the warning and press Delete.
CoreSync refuses to delete a ticket that:
- was converted into a subscriber,
- has materials issued from inventory, or
- has a compensation on it.
Those tickets are part of your records. Close them instead.
Common mistakes#
- Writing to the customer in Comments. Comments are staff-only. Use Send update.
- Giving technicians Close Tickets. Then nobody checks their work. Keep closing for supervisors.
- Expecting the booking SMS to go out by itself. The installation SMS rule starts switched off. Turn it on in Automations.
- Making a New Subscriber ticket for someone who already has an account. Attach the existing account, or closing the ticket creates a second one.
- Tickets with no phone number. Add a mobile, or attach the subscriber, so whoever picks it up can call.
- Deleting instead of closing. Deleted tickets vanish from reports. Delete only what should never have existed.