All guides
Start here
Customers and billing
Hotspot
Network
- Devices, OLTs and ONUs
- Routers, RADIUS and sessions
- TR-069 and remote ONU setup
- Zones, nodes, topology and the map
Support and messaging
Your team and settings
For your subscribers
Troubleshooting
On this page
- Four ways to describe your network
- Zones
- Add many zones at once
- Nodes
- Import or bulk add nodes
- Topology
- Live Scan: let CoreSync find the links
- Share a topology with another ISP
- The Network Map
- Draw fibre routes, closures and splitters
- Find the nearest facility and measure distances
- Import a KMZ or KML file
- Common mistakes
- If it doesn't work
Four ways to describe your network#
CoreSync keeps four different pictures of your network. Each one answers a different question:
| Page | What it holds | What you use it for |
|---|---|---|
| Zones | The areas you serve, such as a town, an estate or a stretch of road. | Grouping customers, plans, staff and payments by area. |
| Nodes | Buildings, estates, apartment blocks or sites inside a zone. | Recording exactly where a customer is, and filtering customers by site. |
| Topology | Diagrams of how your routers, switches and OLTs connect to each other. | Seeing which links and devices are down, and finding a broken ring. |
| Network Map | Your physical plant on a map: fibre routes, poles, closures, FATs, FDTs and splitters. | Planning, finding the nearest facility, measuring distances and seeing what a fault affects. |
Zones and Nodes are under Network → Zones & Sites. Topology is under Network. The Network Map is under Infrastructure, and only shows if your ISP has the map turned on.
Zones#
A zone is an area you serve. Set your zones up first, because other parts of CoreSync use them:
- Subscribers. Each subscriber can have a zone and a node, and the subscriber list filters by both. See Subscribers.
- Plans. A plan can belong to one zone. Leave the zone empty for a plan that's available in all zones. See Plans and speed profiles.
- Staff. In Settings → Users, each staff member can have zones. CoreSync uses them to route tickets by zone. See Staff, roles and approvals.
- Payments. Gateway routing can send the customers of one zone to their own paybill or till. See Payments.
- Messages. SMS and email campaigns can target one or more zones. See Communications.
- Reports, the ONU list and the RADIUS logs can all be filtered or broken down by zone.
To add a zone:
- Open Network → Zones & Sites → Zones and press Add Zone.
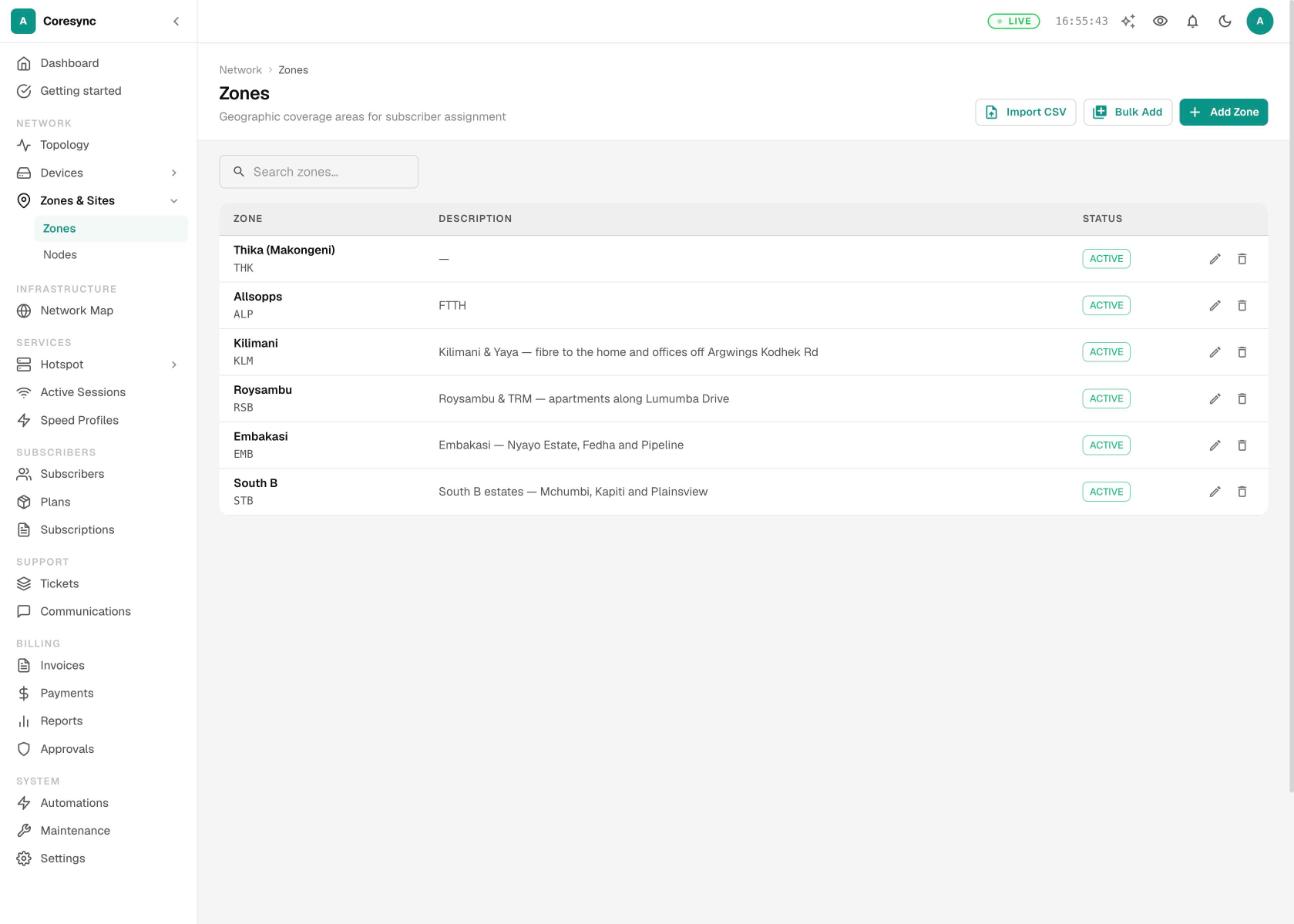
- Type a Zone Name, such as Mlima Estate, and a short Zone Code, such as
MLM. CoreSync turns the code into capitals. - Add a Description if it helps, then press Create Zone.
To change a zone, press the pencil next to it, make your changes and press Update Zone. Use the search box to find a zone by name, code or description.
View Zones & Buildings lets someone see zones and nodes. Manage Zones & Buildings lets them add, edit, import and delete them.
Add many zones at once#
There are two ways to add lots of zones without opening the form each time.
Bulk Add opens a grid that works like a spreadsheet. You can type into it, or copy rows from Excel or Google Sheets and paste them straight in.
- On the Zones page, press Bulk Add.
- Fill in Zone name and Code for each row, and a Description if you like. Press Add row for more rows. Empty rows are ignored.
- Press Save All. Each row gets a tick, or shows its error. Rows that failed stay in the grid so you can fix them and save again. Saved rows are never saved twice.
Import CSV reads a CSV file. It's best when your zones already live in a spreadsheet or come from your old system.
- Save your sheet as CSV with these column headings: Zone Code (needed), Zone Name and Description.
- On the Zones page, press Import CSV, then Choose CSV file.
- Check the preview. It says how many rows are ready to import and shows the first few. Press Import.
- CoreSync shows how many zones it created, updated and couldn't import, with the reason for each failed row.
zone code and ZoneCode both work. But a column called just Name isn't picked up for zones. Call it Zone Name, or every zone is named after its code.Nodes#
Nodes are the buildings, estates, apartment blocks and other sites inside a zone. Linking a customer to a node tells your team exactly where they are, and lets you filter the subscriber list by site. Some buttons on this page still say building, because nodes are stored as buildings.
- Open Network → Zones & Sites → Nodes and press Add Building. The Create Node form opens.
- Pick the Zone, then type the Node Name, such as Kijani Heights Block A. A Node Code is optional, but you need one if you'll update nodes by import later.
- Add the Address and Street. For the location, press Get from Address to look it up, or Pick on Map to place it yourself. On the map, click or drag the marker, then press Confirm Location.
- Choose the Node Type (Commercial, Residential, Datacenter, Mixed Use or Other), add Total Floors, Description and Notes if you like, and press Create Building.
You can also add a node while you add a subscriber: press the + next to the Node field in the subscriber form.
Use the search box and the Zone filter to find a node. Press the pencil to edit one.
Import or bulk add nodes#
Bulk Add on the Nodes page opens the same kind of grid as for zones. Its columns are Zone, Node name, Code, Type, Address, Floors, Latitude and Longitude. Coordinates are optional; you can add them later with Pick on Map.
Import Nodes reads a CSV. It suits a node list exported from your old system.
- Give your CSV these headings: Node Code, Name and Zone Code (all three needed), plus Zone Name, Type, and either Latitude and Longitude or one Coordinates column written as
-1.2345,36.8765. - Press Import Nodes, then Choose CSV file.
- Check the preview, then press Import. The button shows how many rows it will import, for example Import 8.
What the import does with each row:
- If the zone code doesn't exist yet, CoreSync creates the zone, using the Zone Name if you gave one. The result counts how many zones it created.
- If the node code already exists, that node's name, zone and coordinates are updated.
- A new node is saved as Commercial and Active. Whatever is in the Type column is written into the node's notes.
- A bad row is skipped and listed with its reason. The other rows still import.
Topology#
A topology is a diagram of part of your network: a fibre ring, a backbone, or the routers at one site. It shows each device's live status and the links between them, so you can see at a glance what's down.
- Open Network → Topology. Pick a topology from the list at the top. All Devices shows every device and link you have.
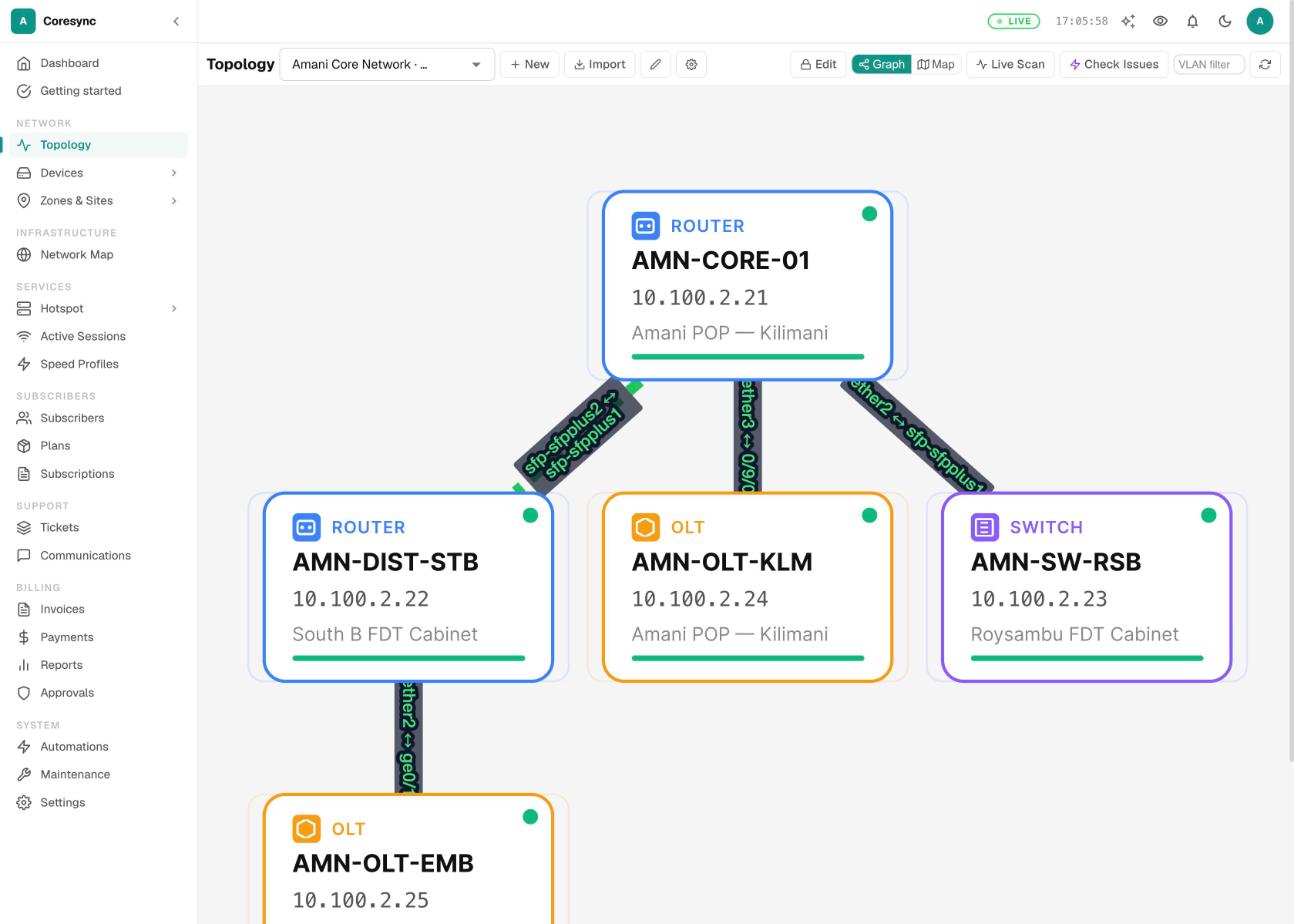
- To make a new one, press New. Give it a Name, a Type (RING, MESH, STAR, HUB SPOKE, POINT TO POINT, TREE or CUSTOM) and a Color. Tick Draft / planning mode if it's a plan, not something already built. Press Create.
- Press Edit to unlock the diagram, then Add Devices. Tick the devices you want, or search by name or IP. For a device you haven't installed yet, use Create proposed device and add to topology.
- Press Add Link. Pick the From Device and To Device, type the port at each end (for example
sfp1orether1), and choose a Link Type and Link Role. Press Create Link.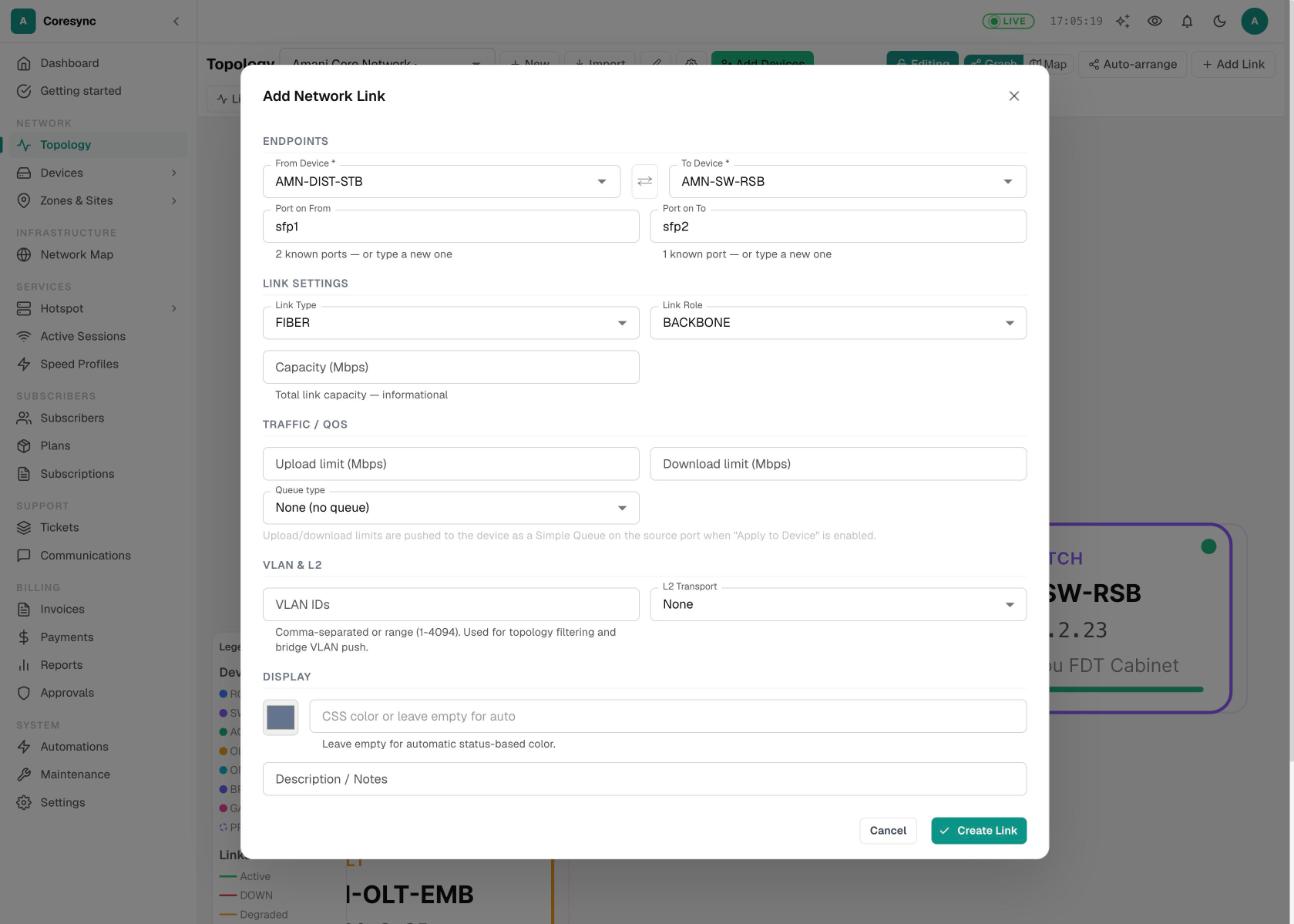
- Drag devices to tidy the layout, or press Auto-arrange. Press Editing again to lock the diagram when you're done.
Reading a topology:
- For a RING topology, a bar at the top says Ring intact, or Ring broken with how many links are down, how many devices are offline and which VLANs are affected.
- Graph and Map switch between the diagram and the same devices on a map.
- Type a VLAN number into VLAN filter to highlight the links that carry it.
- Check Issues looks for links that loop back to the same device and links drawn twice.
To rename or delete a topology, press the pencil next to the list. Deleting a topology only removes the diagram. The devices and links stay.
View Network Devices lets someone see topologies. Edit Network Devices lets them create topologies and add devices and links. Delete Network Devices lets them delete a topology.
Live Scan: let CoreSync find the links#
Instead of drawing every link by hand, Live Scan asks your routers what they're connected to. CoreSync logs in to each router and switch in the topology, reads its interfaces, neighbours and VLANs, and shows each device's result live as it goes.
- Open the topology and press Live Scan. A log bar shows each device as it's scanned.
- When it finishes, a summary bar says how many devices were queried, how many were unreachable, how many links were found, and whether any link you drew wasn't seen.
- In Scan Results, tick the links you want and press Apply. Links marked SELF-LOOP or DUPLICATE are problems; Select problems picks them all so you can review them. Tick Replace all to replace the links you drew with what the scan found.
Scanning only reads from your routers. Applying changes the diagram in CoreSync, not the routers.
Anyone who can see the topology can run a scan. Applying the results needs Edit Network Devices.
The Network Map#
The Network Map (Infrastructure → Network Map) is your physical plant: where your fibre runs, and where every pole, manhole, closure, cabinet, FDT, FAT and tower stands. It's an optional part of CoreSync. If your ISP doesn't have it, the page says it isn't included in your plan; see pricing.
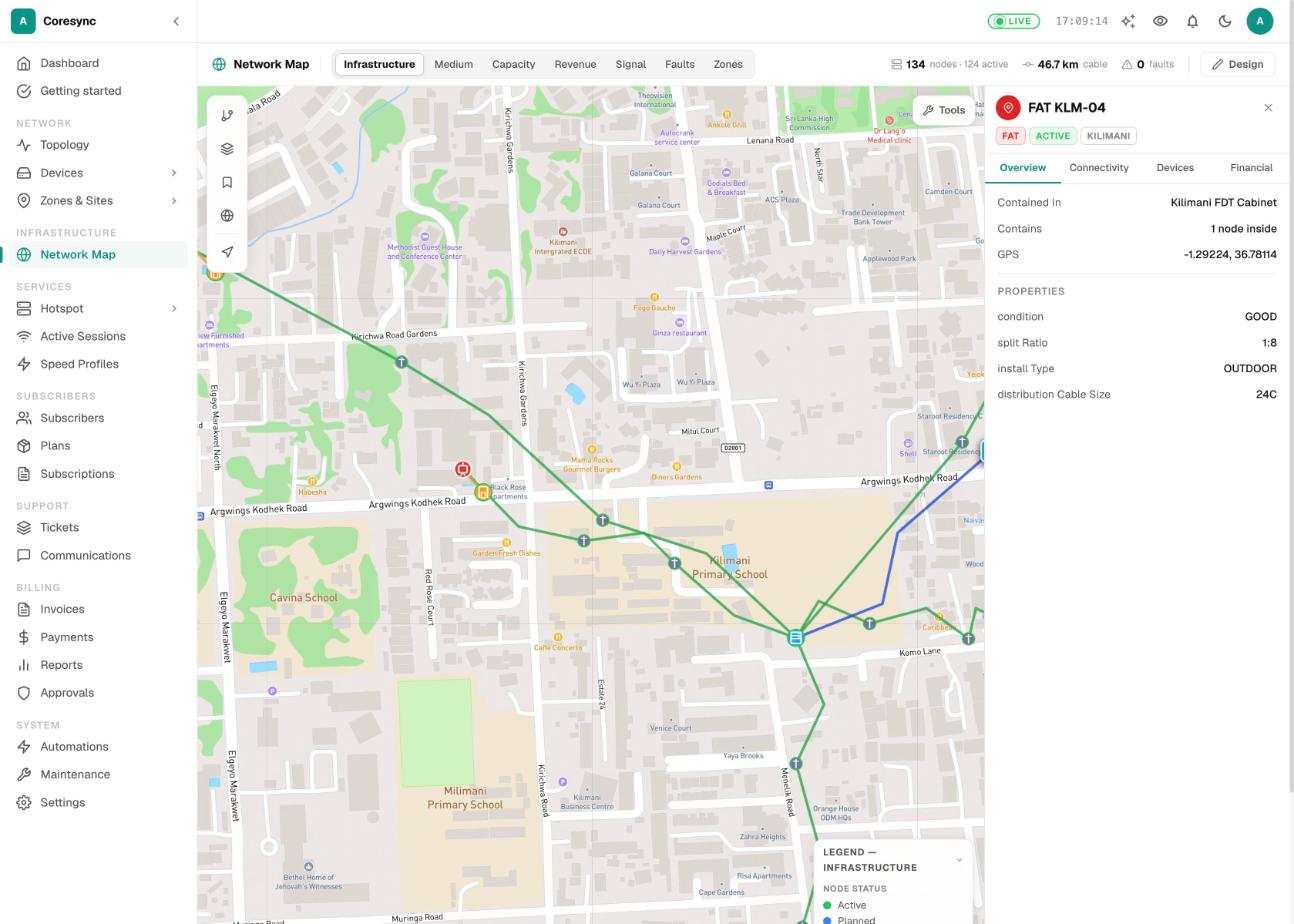
The buttons along the top change what the colours mean:
| View | What it shows |
|---|---|
| Infrastructure | Your plant coloured by status: planned, active, damaged or decommissioned. |
| Medium | Cables coloured by type (aerial, duct, buried, feeder, drop) and core count. |
| Capacity | How full each node's ports are. |
| Revenue | Monthly revenue per node. |
| Signal | Optical power at subscriber ports. |
| Faults | Cut and degraded links, and what they affect. |
| Zones | Your service zones drawn over the map. |
The header also counts your nodes (and how many are active), cable length and open faults, plus ports used once your nodes have ports. Click the faults count to jump to the Faults view.
On the left edge:
- Network explorer: search for a node or place, or type coordinates such as
-1.29, 36.82to jump there. - Layers: show or hide each node type and cable medium.
- Saved views: save where you're looking (Save current view) so the team can jump back to it. Set one as the default to open the map there.
- Basemap changes the background map, and My location centres on where you are.
The Tools menu at the top right has overlays (Homes passed, Saved zones, Network devices, ONUs), analysis (Attribute table, Bill of materials, Draw zone — area BOM, Merge pass-through segments, Design QA) and Import KMZ / KML.
Click any node to open its panel. Overview has its details, Connectivity its cables, splices and Trace route to root, Devices the splitters and equipment inside it, and Financial its revenue and costs.
Draw fibre routes, closures and splitters#
You add and change things on the map in design mode. Everything new starts as Planned, so plans don't look like live plant.
- Press Design at the top right. The header shows DESIGN MODE and a toolbar appears with Select, Add Node and Draw Link.
- To add a pole, closure, FAT or other node, choose Add Node and click the map where it stands. Pick the Node Type, type a Name, and fill in the Status, Zone and Address. Press Place Node.
- To draw a fibre route, choose Draw Link and click the node where the cable starts. Click each pole or manhole it passes, then click the node where it ends. Undo removes the last point and the × discards the route. Fill in the cable's form and press Create Link.
- To add a splitter, click its FAT or FDT, open the Devices tab and press Add splitter / patch panel. Choose SPLITTER, set the Split ratio and number of ports, and press Add Device.
- When something is built, open it and change its Status to Active. Mark a damaged cable as DEGRADED or CUT so it shows in the Faults view.
- Press Exit Design when you're done.
To move a cable, select it and press Edit route on map. Design QA in the Tools menu checks for common drawing mistakes, such as a node with no GPS position, a fibre cable without a core count, or a cable that ends at a bare pole.
The Passive Devices page lists every splitter and patch panel in one table; see Devices, OLTs and ONUs.
Edit Network Devices lets someone add and change things on the map. Delete Network Devices lets them delete them.
Find the nearest facility and measure distances#
Right-click anywhere on the map for its menu. This is how you answer "can we connect this customer, and from where?"
- Right-click the customer's location and choose Find nearest…. Pick what you're looking for: All, OLT, Fat, a closure, a switch, an ONU and so on. Each shows how many you have, for example Fat (24).
- The panel lists the closest ones, with their distance. Turn on Active only to leave out planned plant, or Free ports to show only nodes with a port left.
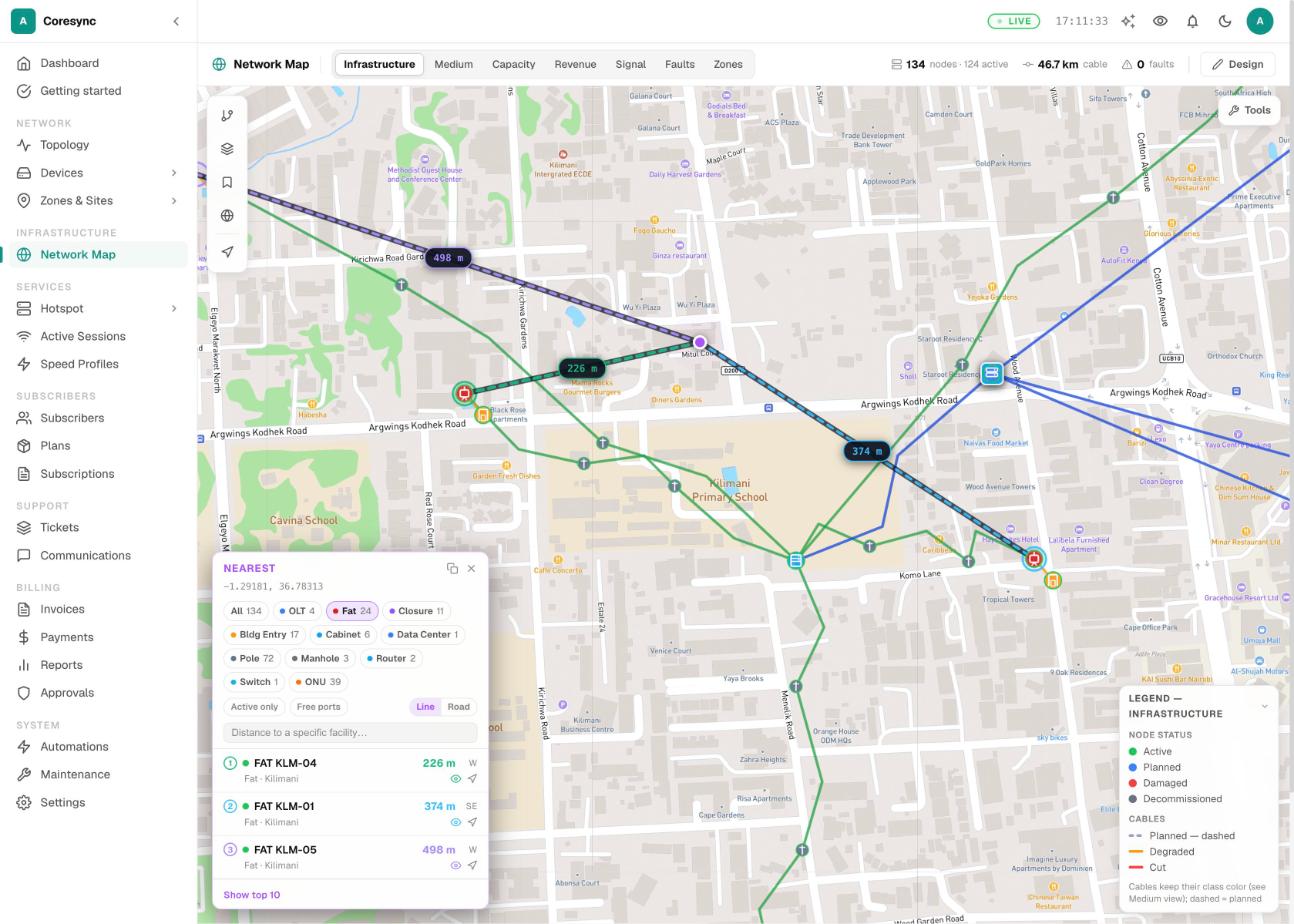
- Switch Line to Road to rank by distance along the roads instead of a straight line. Use Copy report to paste the result into a ticket or a message.
To measure a cable run or a distance:
- Right-click where you want to start and choose Measure distance from here.
- Click each point along the way. The total distance and number of segments update as you go.
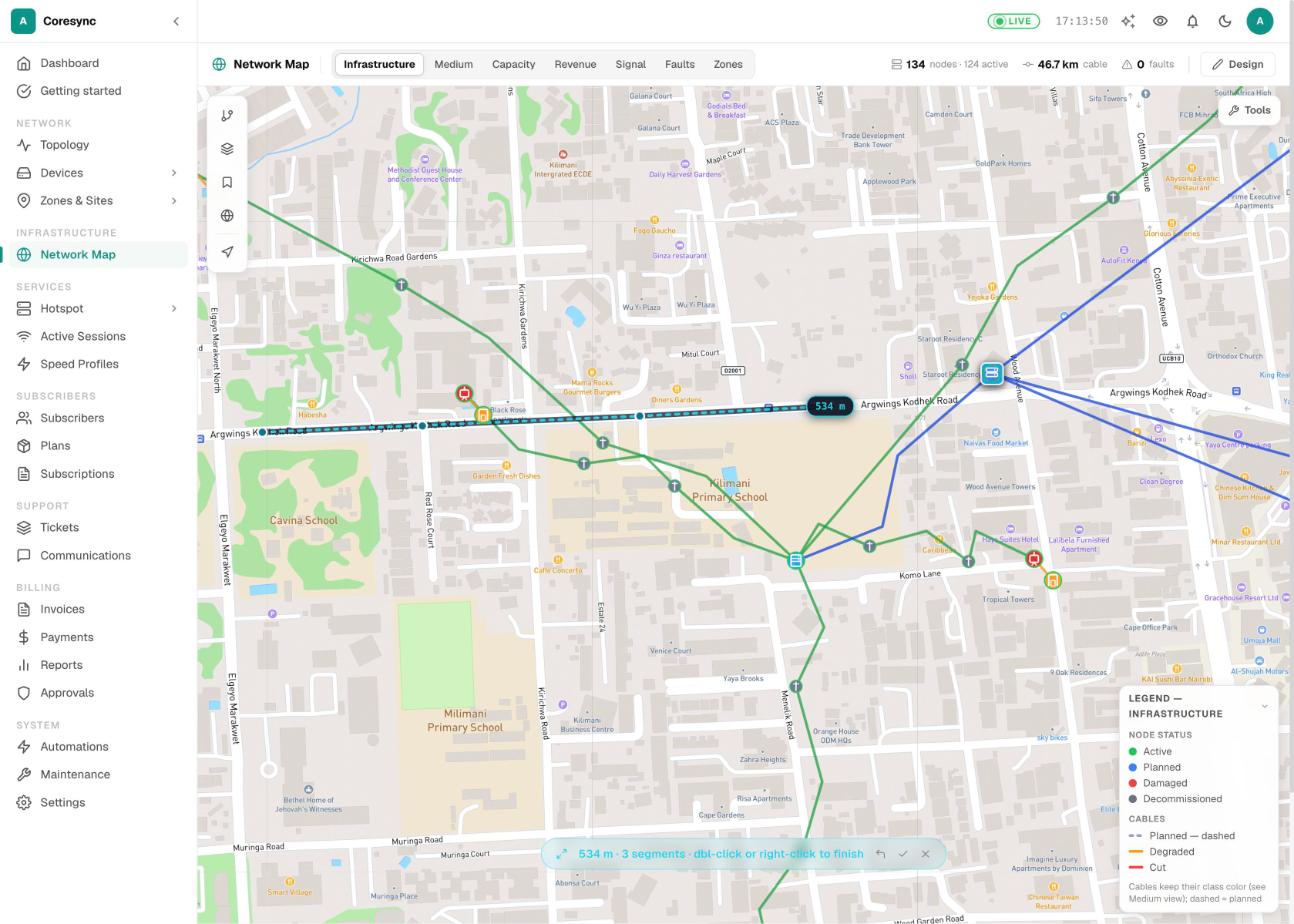
- Double-click or right-click to finish. Press Esc to cancel, or the undo arrow to remove the last point.
The same menu has more:
- Check serviceability says whether the spot is Serviceable, and estimates the drop cable, splitter, free ports, signal loss and installation cost.
- Plan route from here: click a second point to see the road route between them and its length.
- Copy coordinates and Open in Google Maps help you send a technician to the spot.
Import a KMZ or KML file#
If your network is already drawn in Google Earth or a planning tool, import it instead of drawing it again.
- Open Tools and choose Import KMZ / KML. Pick the file.
- The KMZ Layer Mapper lists each folder (layer) in the file. For each one, choose what it is (a node type such as FAT or Pole for points, or a cable medium for lines) and its status. Press the arrow next to a layer for its owner, role, core count, notes and tags. Untick layers you don't want. A View / batch tag at the bottom is added to everything you import.
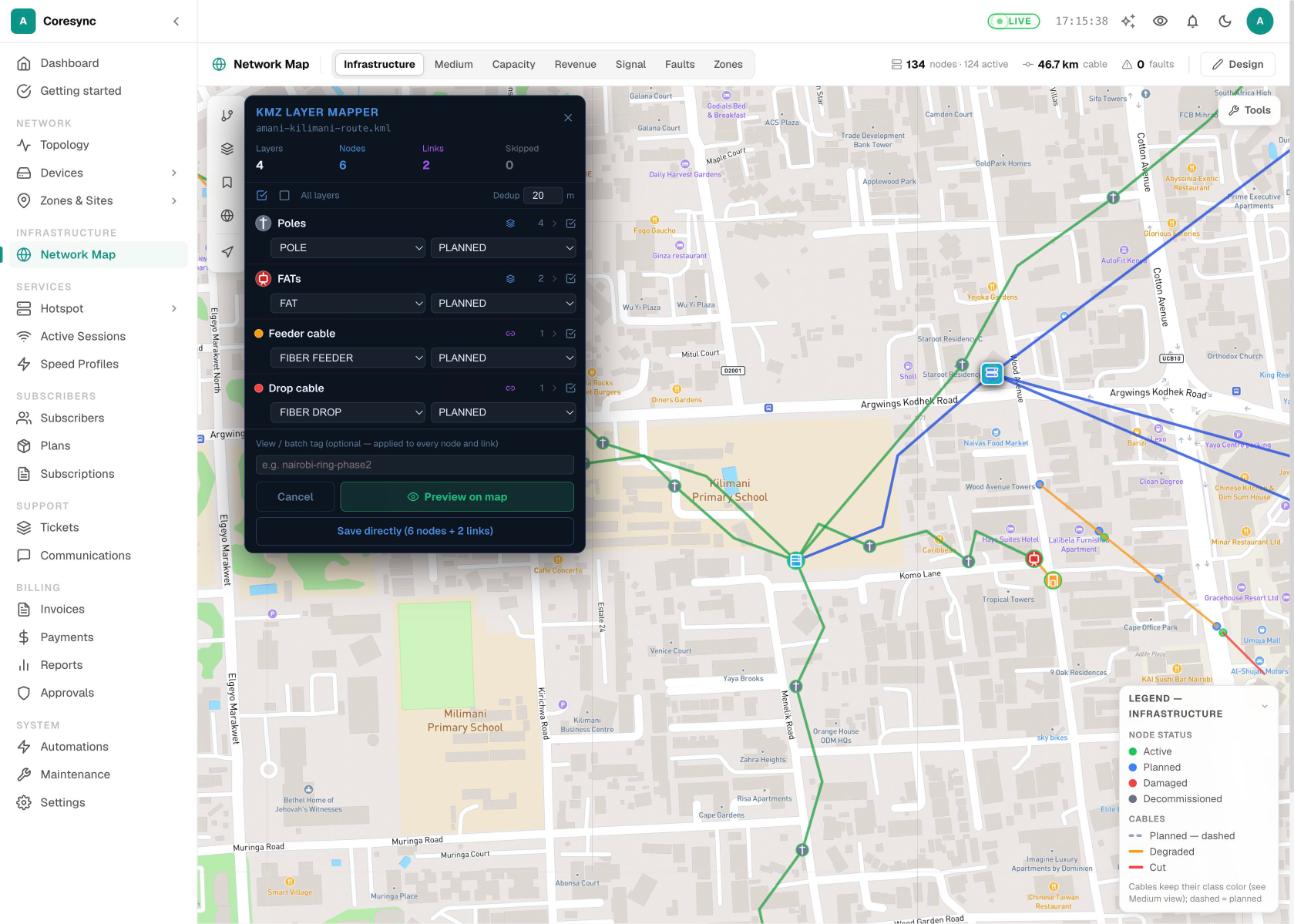
- Set Dedup: points within that many metres of something already on the map are skipped. The default is 20 m.
- Press Preview on map to see it before saving. Click a feature to change it. Press Save all, or Back to configure to change the layers. If you're sure of the file, Save directly skips the preview; it shows how many nodes and links it will save.
CoreSync then tells you how many nodes and links it created and how many it skipped as duplicates.
Common mistakes#
- Changing codes between imports. Imports find existing zones and nodes by code. A new code makes a new zone or node, and you end up with doubles.
- Calling the zone name column "Name". For zones, call it Zone Name, or each zone is named after its code.
- Deleting a zone that's still in use. Move its subscribers, nodes, plans and staff first.
- Ticking Apply to Device by accident. It changes the real router when you save a link.
- Looking for nodes on the map. The Nodes page and the Network Map are separate lists.
- Leaving built plant as Planned. Set it to Active, or the map and the nearest search (with Active only on) treat it as not built yet.
If it doesn't work#
| What you see | What to do |
|---|---|
| The import says Could not find a column for… | A needed column heading is missing or spelled differently. The message lists the headings it found. Rename the column and choose the file again. |
| Live Scan shows a device as unreachable, or skips it. | The device is offline, not managed, set to ping only, or its saved login is wrong. Fix it on the device page, then scan again. |
| The Network Map says it isn't included in your plan. | Your ISP doesn't have the map turned on. See pricing. |
| Find nearest… misses a node you know is there. | Nodes without a GPS position are left out. Open the node and add its latitude and longitude. |
| Road routing failed in the nearest panel. | The road route couldn't be worked out. Switch back to Line for straight-line distance. |